Structural Insulated Panels: Costs, R-Value and Barndo Fit
Structural insulated panels explained for barndominium buyers: whole-wall R-value, build time, cost drivers and the questions to ask before you sign.
You've got a barndominium floor plan, land to build on, and quotes that describe very different buildings. One builder offers a metal shell, another prices conventional framing, and a third recommends structural insulated panels for a tighter, faster enclosure. The hard part isn't choosing the most impressive insulation number. It's finding out what each price includes, what your site can support, and which decisions you'll have to make before construction starts.
Table of Contents
- How Structural Insulated Panels Compare at a Glance
- Reading R-Value Without the Marketing
- How a Structural Insulated Panel Is Built
- Protecting Panels From Moisture Before Enclosure
- Build Time and Cost Compared Across Three Systems
- Is a Barndominium the Right Project for SIPs
- Confirm the Builder, Scope and Fire Documents Before You Sign
How Structural Insulated Panels Compare at a Glance
A structural insulated panel, usually called a SIP, is a factory-made sandwich of foam insulation bonded between structural skins, commonly oriented strand board, or OSB. The bonded assembly works as a wall or roof component rather than separate framing, sheathing, and cavity insulation.
For a barndominium buyer, the useful comparison is between complete building assemblies, not bare materials. A metal frame isn't an insulated wall, and a stack of panels isn't a finished, weatherproof home.
Structural insulated panels, stick frame and metal building side by side
| Criterion | Structural insulated panels | 2x6 stick frame | Metal building |
|---|---|---|---|
| Whole-wall R-value | Relatively continuous insulation, interrupted at connections | Studs and plates reduce cavity insulation performance | Set by insulation continuity and treatment of steel bridges |
| Airtightness | Panel joints and transitions need deliberate sealing | Seal sheathing, cavities, plates, and penetrations | Seal liners, cladding transitions, openings, and penetrations |
| Framing labor | Factory fabrication shifts work away from the site | More individual components assembled in the field | Efficient repetitive frame assembly; enclosure remains separate |
| Wall or panel thickness | Selected for structural and thermal requirements | Stud depth plus sheathing and finish layers | Frame, insulation, liner, and cladding determine assembly depth |
| Interior flexibility | Changes need planning; service chases should be designed in | Straightforward to alter before finishes | Interior partitions generally need separate framing |
| Best fit | Energy-focused shell with a settled design | Projects needing field flexibility | Large clear-span shell |
Where each system earns its place
Panels win on integrated envelope performance and erection speed when the design is settled and the installation crew is prepared.
Stick framing wins on field changes, especially when room layouts and service routes remain undecided.
Metal buildings win on large clear-span shells, where the primary need is open space rather than a ready-made residential envelope.
These aren't absolute rankings. A carefully detailed framed wall can perform well, while poorly sealed panels can disappoint. Likewise, a rapidly erected steel frame can still require substantial enclosure and interior work.
Start with your priority: Decide whether energy performance, schedule, flexibility, or clear span matters most before comparing package prices.
Rank those priorities against your actual plan. A workshop with attached living quarters presents a different buying decision from a compact, fully conditioned home.
Reading R-Value Without the Marketing
Whole-wall R-value describes something different from the number printed on insulation packaging. A center-of-cavity rating describes insulation away from framing; a whole-wall assessment accounts for the assembly's framing and other interruptions.
The Whole Building Design Guide reports approximately R-14 for a 4-inch SIP, compared with less than R-10 for a typical 2x4 insulated wall and approximately R-11 to R-13.7 for a 2x6 wall, with batt-installation quality affecting the framed-wall result. It also lists approximate insulation values per inch of R-3.6 for EPS, R-5.0 for XPS, and R-6.54 for polyurethane.
The reason is straightforward: conventional studs create repeated thermal bridges, allowing heat to pass through the framing rather than the insulation. SIPs reduce that repeated framing pattern, although panel connections and structural inserts still matter.
Foam ratings aren't assembly ratings
The following totals are simple calculations from those approximate per-inch values. They describe foam alone, not tested wall performance or the thickness of a finished panel.
Foam core R-value per inch and approximate 4-inch core totals
| Foam core | R-value per inch | Approximate 4-inch core total |
|---|---|---|
| Expanded polystyrene (EPS) | R-3.6 | About R-14 |
| Extruded polystyrene (XPS) | R-5.0 | About R-20 |
| Polyurethane foam | R-6.54 | About R-26 |
Don't multiply a panel's overall thickness by its foam rating. The skins occupy part of that thickness, and the completed assembly contains connections that aren't uninterrupted foam.
Nor should you assume the highest-rated foam automatically produces the best purchase. Structural requirements, available panel sizes, connector design, and installation details all affect the finished result.
What belongs in the specification
A useful thermal submission identifies the actual construction, including:
- Framing splines and structural inserts, especially around openings and concentrated loads.
- Interior and exterior finishes, rather than an unspecified bare panel.
- Fasteners, openings, and corners, with the assumptions used to account for thermal bridges.
- Roof-to-wall transitions and penetrations, including how the air-control layer remains continuous.
Ask the supplier for the whole-wall value of the complete tested or modeled assembly, together with the drawing that matches it. If the response is only a foam brochure, you still don't have an assembly comparison.
Use the same discipline with metal buildings. An insulation blanket's advertised rating doesn't describe the effect of steel members, compression at attachments, or gaps around framing.
Thickness and detailing can matter as much as foam chemistry. Buy the documented assembly that meets your project requirements, not the largest number on the sales sheet.
How a Structural Insulated Panel Is Built
A SIP works somewhat like an I-beam: the separated faces resist bending, while the core holds them apart and transfers forces between them. That analogy explains the structural sandwich, but it doesn't replace engineering for loads, spans, openings, or connections.
The cross-section makes the relationship easier to understand.
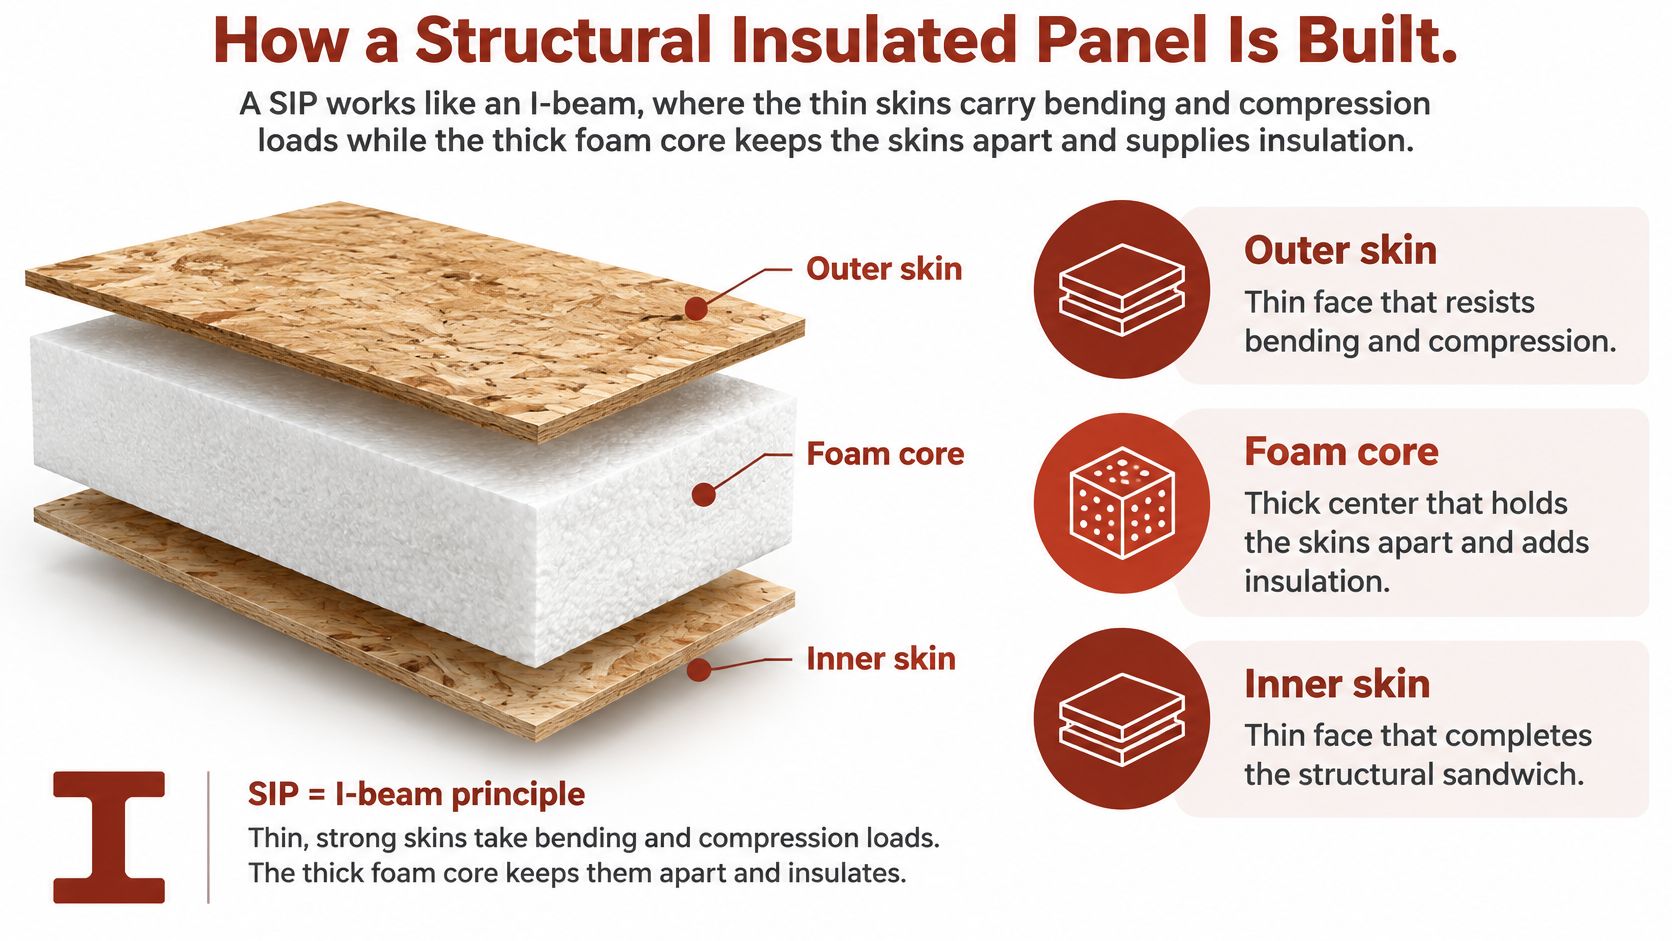
The structural facings are commonly OSB, bonded to an insulating core such as EPS, XPS, or polyurethane. Splines, which may use lumber or engineered connectors, join adjacent panels and help establish the load path.
According to the Whole Building Design Guide's SIP overview, the Forest Products Laboratory developed early stressed-skin panels in 1935, Alden B. Dow developed foam-core SIPs in 1952, and prescriptive SIP provisions entered the 2007 supplement to the 2006 International Residential Code. The product has a substantial development history, but your project still needs current, applicable documents.
From shop drawings to a standing shell
- Approve the fabrication drawings. Confirm dimensions, openings, bearing points, and service routes before panels are cut.
- Receive and stage the shipment. Arrange panels in erection order so the crew isn't repeatedly moving the same stack.
- Set the panels. Use the specified lifting equipment, often a crane for large components, and brace them according to the installation plan.
- Connect and seal. Install splines, fasteners, and the specified joint sealants or tapes as the assembly proceeds.
A level, accurately laid-out foundation matters. Crews shouldn't have to compensate for slab or foundation errors by improvising panel connections.
This video provides another view of panel construction and assembly.
For a barndominium's long walls and broad roof planes, panel layout deserves early attention. Plan the seams, lifting access, and connection sequence before delivery, rather than treating the shipment as oversized conventional lumber.
Protecting Panels From Moisture Before Enclosure
Large roof areas, exposed slab edges, metal cladding, and rural delivery schedules create a practical problem: panels may arrive before the site is ready to protect them. Fast erection won't help if the shipment sits in wet soil or the roofer arrives after repeated rain.
The Pacific Northwest National Laboratory's SIP guidance calls for storing panels off the ground, protecting them from standing water and wet soil, and continuously sealing joints. It also flags the possible need for additional engineering in high-wind and seismic locations.
Arrange level supports and a protected staging area before the truck arrives. Keep covers secured and sloped so they shed water instead of forming pockets above the stack, while following the supplier's storage instructions.
A pre-cover inspection routine
- Walk the delivered panels. Look for swollen faces, staining, crushed edges, damaged lifting locations, and visible separation. Photograph questionable areas and identify the panel on the layout drawing.
- Check the storage arrangement. Look beneath covers and around supports, not just at the exposed top panel. Remove standing water and correct the source of wetting.
- Measure before concealment. Use an appropriate moisture meter under the supplier's procedure. Obtain written acceptance thresholds and measurement instructions rather than inventing a universal pass-or-fail reading.
- Resolve damaged panels. Quarantine suspect components for the supplier's or engineer's written disposition. Replace structurally damaged panels unless an approved repair detail specifically addresses the damage.
- Assign responsibility. Name the contractor responsible for temporary covers, membrane detailing, inspections, and replacement costs.
A stained face isn't automatically a failed panel, and a dry-looking face isn't proof that the entire component is acceptable. The decision should follow the manufacturer's criteria and the engineer's assessment where structural damage is possible.
Don't let siding or roofing turn an unresolved wet-panel question into a concealed condition.
Give the assembly a drying path
The foam core can restrict vapor movement, so adding impermeable layers on both sides isn't automatically safer. Specify an exterior weather barrier that permits the intended outward drying, with a ventilated drainage space behind the cladding where appropriate to the assembly.
Metal siding sheds most rain, but it doesn't eliminate flashing, drainage, or drying requirements. Window heads, wall bases, roof edges, and penetrations still need coordinated details.
Request wall and roof sections for your climate zone and intended indoor conditions. The drawings should identify the water-control layer, air-control layer, drainage space, and any vapor-control layer, with a named trade responsible for each transition.
Build Time and Cost Compared Across Three Systems
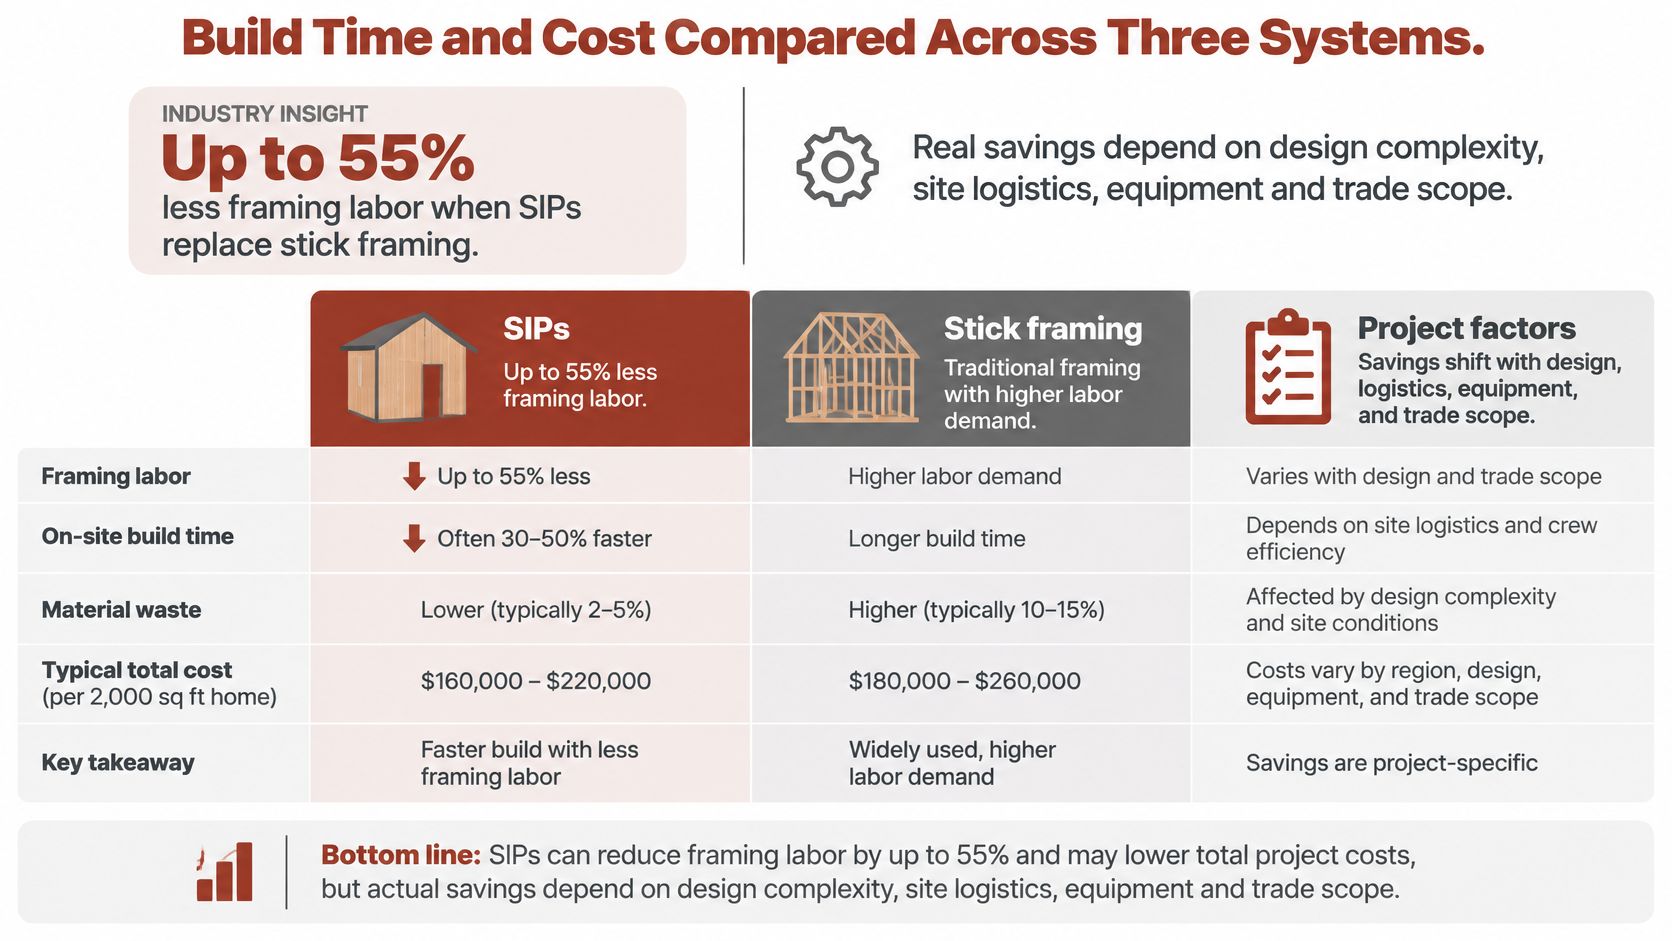
The Structural Insulated Panel Association's sustainability resources cite construction-cost research estimating framing-labor reductions of up to 55% when SIPs replace conventional stick framing. That's a framing-labor finding, not a promise of equivalent savings on the entire house; design complexity, site logistics, equipment, and trade scope affect the result.
Cost and schedule drivers by building system
| Driver | Structural insulated panels | Stick frame | Metal building |
|---|---|---|---|
| Framing labor | Factory work reduces field assembly | Individual framing and sheathing operations | Repetitive frame assembly; enclosure priced separately |
| Erection time | Pre-cut panels set in a planned lifting sequence | Sequential layout, framing, and sheathing | Frame erection followed by enclosure work |
| Weather exposure | Open period can shorten after setting and sealing | More assembly takes place outdoors | Frame can stand before insulation and interior enclosure |
| Insulation installation | Core included in the panel | Separate insulation operation and inspection | Requires a specified insulation and liner assembly |
| Change-order exposure | Fabricated panels constrain late changes | Easier to alter before finishes | Structural changes require coordination with frame design |
| Total cost per square foot | Establish through a complete local bid | Establish through an equivalent local bid | Establish through an equivalent local bid |
The labor comparison is useful, provided the buyer keeps its limits in view.
Follow the work through the calendar
SIP construction moves decisions and work into design and fabrication. The field crew benefits only when approved drawings, foundations, delivery, lifting equipment, and installers are ready together.
Stick framing leaves more decisions available on site, but framing, sheathing, insulation, and related inspections remain distinct operations. A metal building also needs more than frame erection: residential insulation, air sealing, service cavities, and finishes must be scheduled.
A panel package can therefore shorten enclosure work without shortening every part of construction. Fabrication lead time, permit review, utility connections, and interior finishes still belong on the schedule.
Don't turn test results into a budget guarantee
SIPA's cited comparisons include SIP construction approximately 15 times more airtight than a comparable fiberglass-insulated stick-framed test room, and a separate monitored SIP house using 15% less electricity for heating while being 38% tighter than its conventional counterpart. Those findings describe particular comparisons, not guaranteed savings for your floor plan or utility bill.
Its BuildingGreen summary also describes common panel thicknesses of approximately 4.5 to 12.25 inches, with a 4.5-inch polyurethane-core panel at about R-25, versus approximately R-15 for a similar-thickness EPS panel. Those nominal product comparisons shouldn't replace the complete assembly specification.
Compare the same purchased scope
The expensive omissions are often ordinary job costs: freight, unloading, crane mobilization, temporary weather protection, membrane work, engineering, and replacement responsibility. A low panel quote may stop earlier than a competing shell quote.
Use the barndominium cost guide to organize the larger budget, then obtain competing bids against one written scope. Require each contractor to price or explicitly exclude every line item.
Compare shell with shell or turnkey with turnkey, using the same floor-area definition. Don't divide a conditioned-home price by an area that includes an unfinished shop or porch and call the result a cheaper house.
Is a Barndominium the Right Project for SIPs
SIPs fit buyers who can make enclosure decisions early and keep them stable. They're less forgiving when the owner expects to relocate windows, move bathrooms, or redesign service routes after the shell arrives.
An open interior can suit panel construction, but open floor plan doesn't mean unlimited structural span. Roof panels still need a designed support arrangement, and large openings may require beams, posts, or other framing.
Strong fits
- An energy-focused home. You want a deliberate enclosure strategy for a substantial heating or cooling load, rather than insulation added after the shell is selected.
- A settled layout. Window locations, exterior doors, major equipment, and kitchen planning are sufficiently developed for fabrication.
- A straightforward roof. Broad roof planes can suit panelized construction when supports, lifting, and connections are engineered.
- A coordinated build. The general contractor can align foundation completion, delivery, erection, weather protection, and roofing.
The strongest project isn't necessarily the simplest-looking building. It's the one whose designer and trades resolve the critical interfaces before manufacturing.
Weak fits
- An evolving floor plan. You expect to adjust openings or move exterior-wall services during construction.
- Unresolved service needs. Plumbing routes, electrical chases, equipment penetrations, or heavy cabinet attachments haven't been designed.
- Poor lifting access. The site lacks suitable equipment access, staging space, or a stable working pad.
- Unclear management. An owner-builder is purchasing separate packages without someone responsible for sequencing them.
Buying rule: Choose SIPs because the project suits prefabrication, not because you hope prefabrication will resolve an unfinished design.
Decide who finishes the house
A shell contract can leave you responsible for electrical rough-in, plumbing, interior service walls, HVAC design, ventilation, and finish work. Plan those systems before ordering panels so the trades have approved routes and attachment details.
When reviewing barndominium shell builders near you, establish exactly where shell responsibility ends. A dried-in enclosure and a finished home require different coordination commitments.
Ask yourself: How fixed is the floor plan? How much will change after enclosure? Who will sequence the trades? If your answers consistently favor keeping decisions open, conventional framing or a separately framed metal-building interior may be the more practical choice.
Confirm the Builder, Scope and Fire Documents Before You Sign
Fire performance belongs to a specific assembly, not a broad claim that panels are fire-safe. Metal siding doesn't change that distinction.
The ICC-ES evaluation report ESR-4694 classifies the covered SIPs as combustible building elements under International Building Code construction-type rules, while permitting specified fire-resistance-rated assemblies constructed as documented. It also requires an approved interior thermal barrier, typically 1/2-inch gypsum board or a compliant equivalent, between the foam and the interior.
Don't treat that report as blanket approval for every supplier or design. Some exterior-wall configurations can also require specialist review of flame-propagation testing requirements; have the design team resolve applicability with the local building department.
Request the document trail
- Current product evaluation report, matching the actual manufacturer and panel.
- Tested wall or roof assembly, including the specified finishes and connections.
- Project engineering drawings, showing loads, supports, fasteners, and openings.
- Thermal-barrier and fireblocking details, including treatment at penetrations.
- Local acceptance and insurer confirmation, obtained before committing to construction.
Code approval doesn't guarantee preferred insurance terms. Send the insurer the actual construction description rather than describing the project only as a metal-sided barndominium.
Interview the builder against the scope
We recommend asking for two recent local references, a finished project to visit, the builder's typical permit timeline in your county, whether the work is shell-only or turnkey, and which portions are subcontracted. Use the questions to ask a barndominium builder to make those conversations consistent.
Our ZIP search creates a distance-sorted shortlist using local Census ZIP data and researched builder coordinates. Listings reflect barndominium signals on builders' websites, not endorsements or proof of SIP installation competence.
Ask each candidate who reviews panel shop drawings, who supervises sealing, and who signs off before concealment. Request a written answer about damaged-panel responsibility and late design changes.
Choose the builder whose documents, relevant experience, and written scope match the delivery you need. A convincing sales conversation isn't a substitute for a contract that assigns the work.
Visit BarndoBuilderList to build a nearby shortlist of barndominium-friendly builders and compare shell versus turnkey responsibilities. Use that shortlist to request equivalent bids, then ask each candidate for SIP-specific engineering, moisture procedures, and fire-assembly documents before you sign.
- structural insulated panels
- barndominium panels
- SIP construction
- SIP R-value
- SIP cost