Soil Testing for Foundation: A Barndominium Buyer's Guide
Learn why soil testing for foundation is critical before building a barndominium. Covers test types, geotechnical reports, remediation options, and costs.
You're standing on a rural lot with a fresh survey, a floor plan you like, and a builder who says the site “looks fine.” That's exactly the moment soil testing for foundation becomes the difference between a clean build and a future repair bill. The ground can look firm, drain well after a rain, and still hide soft layers, perched water, or chemistry that shortens the life of steel and concrete.
For a barndominium, that matters even more because the foundation isn't just carrying walls, it's carrying a big slab, steel framing, and long-term serviceability. A proper geotechnical investigation turns the soil from a guess into a design input, which is why modern foundation engineering treats it as a decision tool, not a formality. It also helps catch hidden durability risks that many buyer guides gloss over, especially on rural lots where the soil can change quickly from one part of the property to another.
Table of Contents
- Why Soil Testing Matters Before You Build a Barndominium
- How the Standard Penetration Test Reveals What Your Soil Can Hold
- Beyond Bearing Capacity, Lab Tests That Protect Your Foundation
- How Many Borings Are Enough on a Rural Barndominium Lot
- Reading Your Geotechnical Report Without an Engineering Degree
- Foundation Options and Remediation Strategies by Soil Condition
- How to Hire a Geotechnical Engineer and Coordinate with Your Builder
Why Soil Testing Matters Before You Build a Barndominium
A buyer signs a contract on a quiet acreage lot, skips the soil test to keep the project moving, and decides the ground looks firm enough. The slab gets poured, the metal frame goes up, and then hairline cracks show up where the builder did not expect them. By the time the problem is visible, the fix often means excavation, reinforcement, and repair work that a proper investigation could have prevented.
That's the core role of soil testing for foundation work. It does not just answer whether the dirt feels hard underfoot. It shows how the soil carries load, how much water it holds, how it settles, and whether it can chemically attack buried materials over time. That is why soil testing is treated as a pre-construction milestone rather than an optional extra, especially when coordinating with site-prep specialists. One engineering guide also frames it as a low-cost screen compared with the expense of later foundation repairs, while noting that it can be required for higher-risk building categories under NBC 2016 and IS 1904 soil-testing guide.
The decision is bigger than bearing
A barndominium owner often starts with a simple question, “Can the soil hold the house?” That question matters, but it is only part of the picture. Foundation design also has to account for settlement, drainage, corrosive conditions, and the possibility that a strong crust sits above a weak layer.
A soil report protects you from the problems you cannot see from the surface.
That is why geotechnical testing became a formal part of modern foundation engineering. Field and lab methods turn the ground into measurable properties, such as density, compaction, bearing capacity, moisture behavior, and chemical aggressivity, so the engineer can match the foundation to the site instead of forcing the site to fit a default plan geotechnical tests overview. For a barndominium buyer, that report can affect slab thickness, footing depth, the need for piers, or whether the site needs improvement before construction starts.
The hidden value is durability. A soil that can carry the load today may still be a poor choice if groundwater, salts, or mixed fill attack the structure later. That matters especially for steel-frame and slab-on-grade projects, where the foundation and buried metal details have to work together for the life of the building.
Corrosive soils, perched water, and thin sampling are the details that usually get missed on rural lots. A few test holes on the easiest part of the property can make the whole parcel look better than it really is. Wider sampling helps expose changes in soil type, wet pockets, and weak zones before the foundation plan gets fixed around the wrong assumptions.
How the Standard Penetration Test Reveals What Your Soil Can Hold
Video walkthrough of the Standard Penetration Test
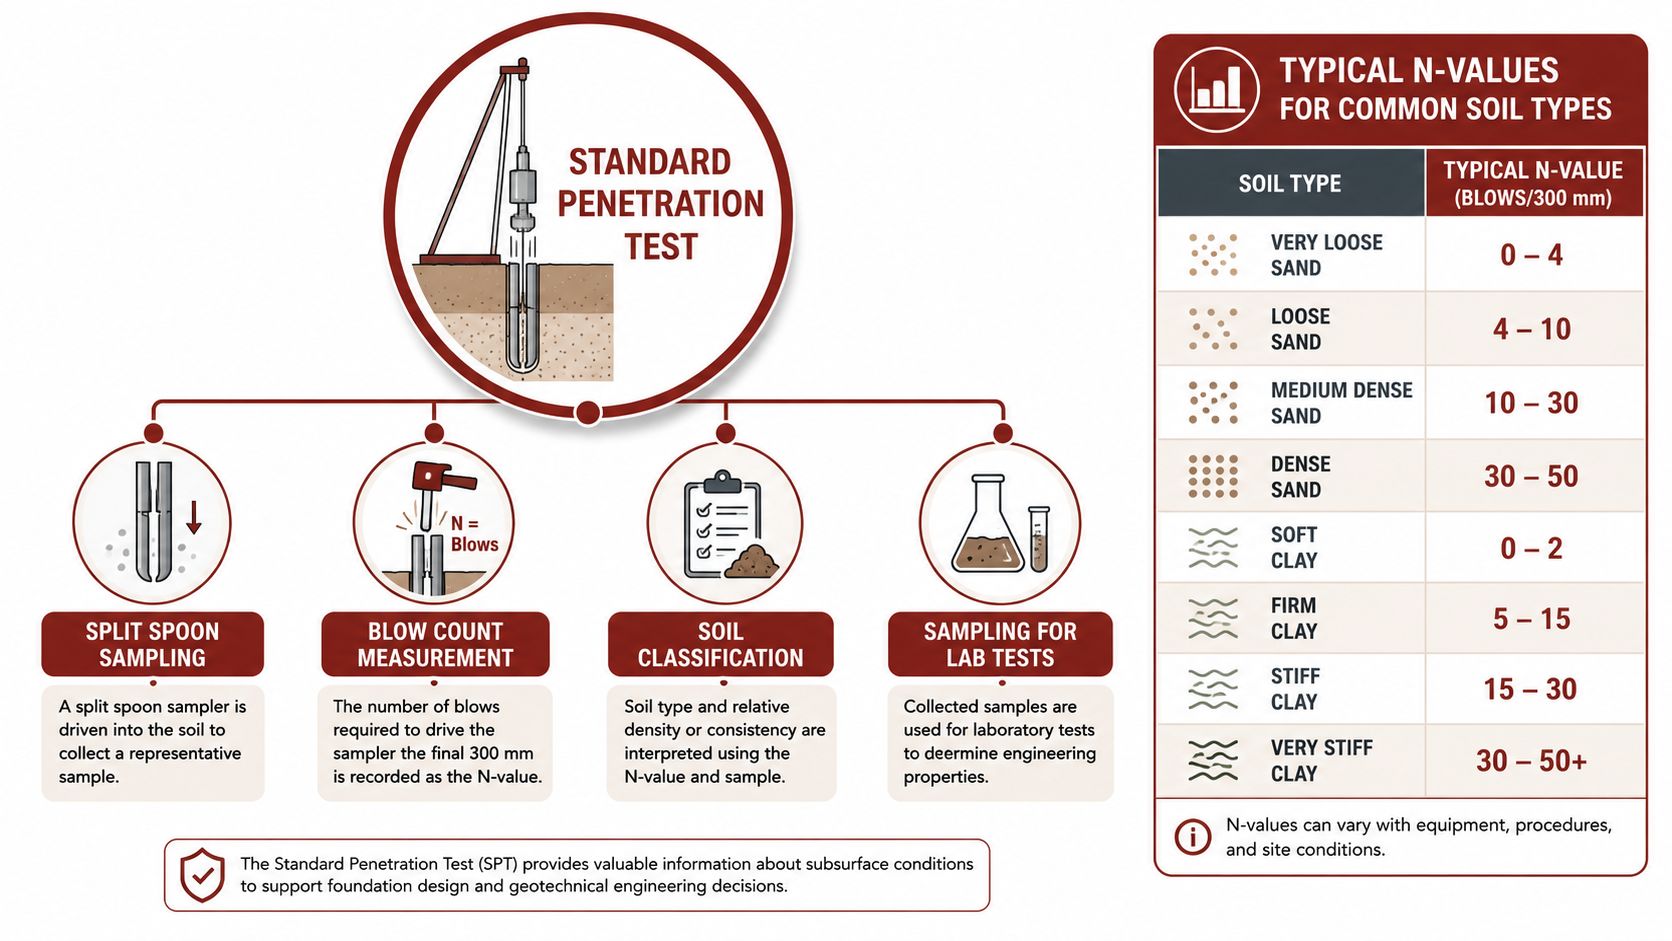
A barndominium lot can look firm on the surface and still hide soft pockets below. The Standard Penetration Test, or SPT, is one of the field tools engineers use to find out what is really there before a footing, slab, or pier is fixed in place. It works like testing the resistance of a stack of layers, the sampler is driven into the ground, the hammer blows are counted, and that count becomes the N-value used to judge soil density, consistency, and expected bearing behavior SPT method.
What the numbers mean
The value matters because it gives the engineer a practical starting point, not because it stands alone. In the design guidance provided in the brief, an N-value of 0–4 points to very soft or loose soil with only 5–8 T/sq.m bearing capacity. A 10–30 range is treated as medium soil with 15–25 T/sq.m bearing capacity, which typically supports spread footings. At the denser end, 30–50 corresponds to 25–40 T/sq.m, and refusal on rock can indicate 100+ T/sq.m and allow direct foundation support foundation capacity ranges.
Those ranges turn into real build decisions. Soft ground may need deeper footings, piers, or improvement before the slab is poured. Medium ground can often support conventional spread footings. Dense soil gives the builder more options, while rock can change the whole foundation approach and reduce uncertainty about settlement.
What a thorough field program looks like
The blow count only tells part of the story if the sampling is too sparse. Foundation guidance often calls for SPT checks at about 1.5 m intervals or at every change of stratum, and shallow-foundation investigations in Caltrans guidance are taken to a depth of 15 feet below the bottom of the footings with sampling at 2.5-foot intervals to assess bearing, settlement, and liquefaction sampling intervals. That spacing is there for a reason, because a few easy test holes can miss a weak lens, a perched wet pocket, or a buried change in soil that only shows up when the pattern is sampled closely.
For a rural lot, that detail matters as much as the number itself. A crust that looks strong near the driveway can sit above softer ground elsewhere, and the variation may be enough to affect slab performance or footing depth. Wider sampling helps the engineer see those changes before the plan gets locked around the wrong assumptions.
The SPT does not just answer whether the soil is “good.” It gives your engineer a field-based way to compare layers, spot weaker zones with depth, and decide whether the foundation should stay shallow, go deeper, or be adjusted for the site instead of for a generic plan.
Beyond Bearing Capacity, Lab Tests That Protect Your Foundation
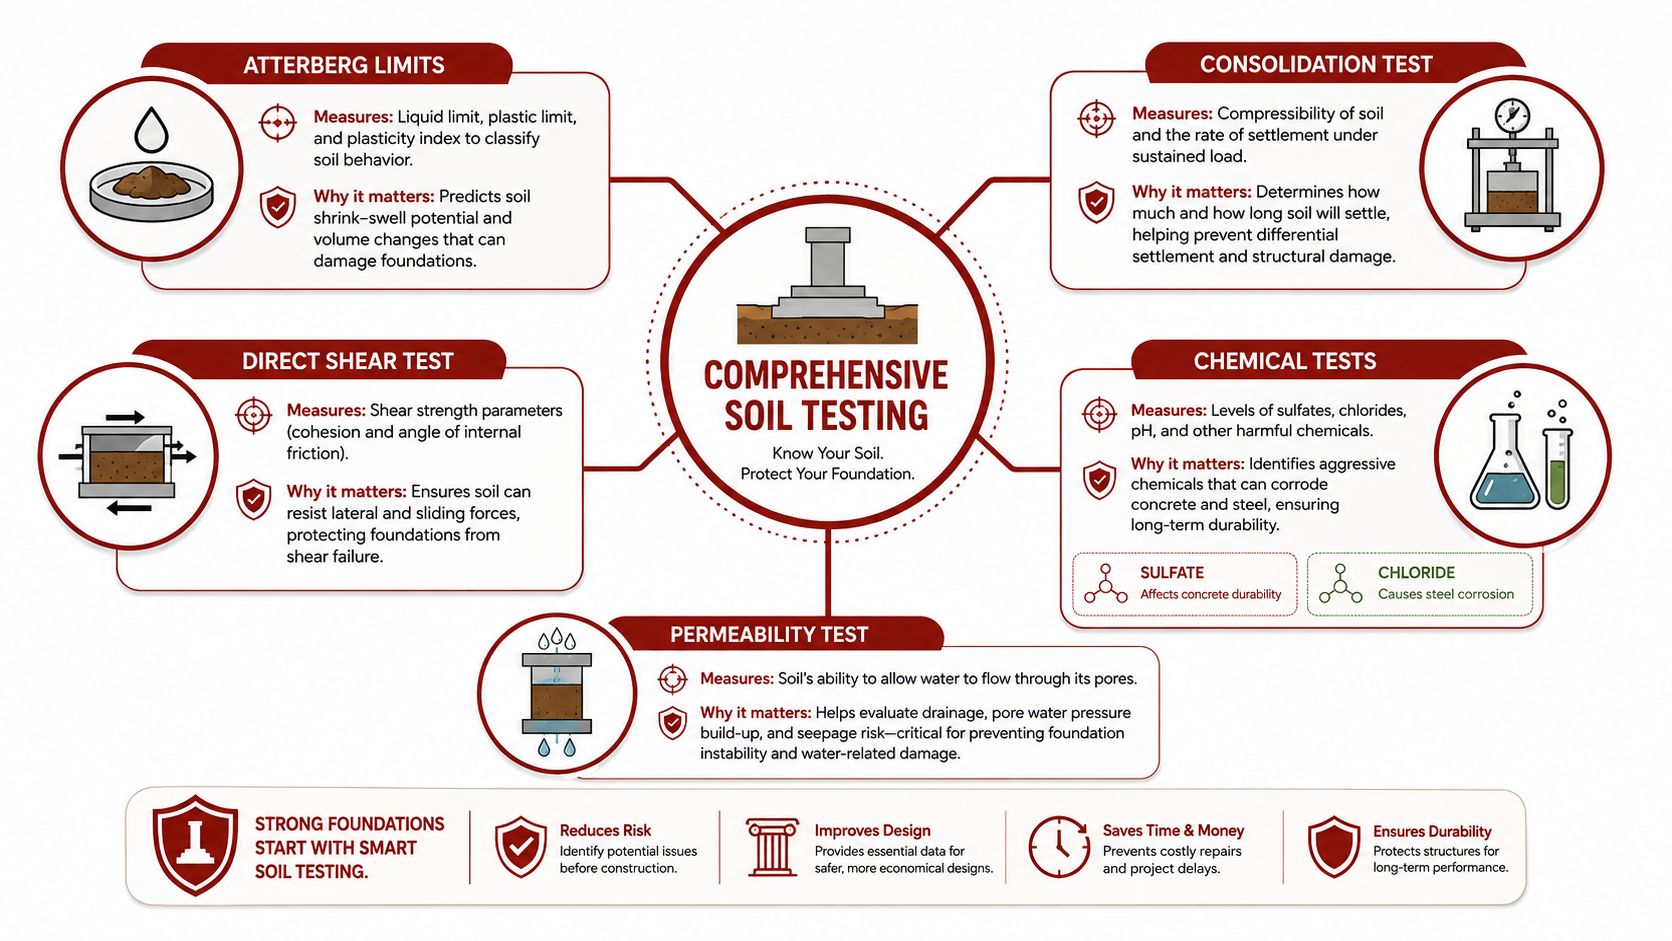
A soil can pass a basic bearing check and still be poor foundation material. A field program that only asks, “Will it hold the load?” can miss the conditions that shorten a slab's life or attack buried metal later. A defensible geotechnical report pairs field exploration with laboratory testing, because the lab side shows whether the ground will swell, shrink, drain, compress, or corrode what is placed in it.
The tests that change the design
A standard foundation-oriented lab suite often includes grain-size distribution, Atterberg limits, natural moisture content, unit weight, unconfined compression, triaxial shear, direct shear, consolidation, permeability, and chemical analyses lab test suite. Each test answers a different question. Grain size separates sandy, silty, and clayey behavior. Atterberg limits show how plastic the soil is. Consolidation testing helps estimate settlement. Permeability shows how water moves through the ground, which matters when a lot has layered soils or a hidden wet zone.
For a barndominium, soil chemistry can matter as much as strength. Caltrans specifically calls for corrosion testing on soil and groundwater that will contact foundation elements, and it recommends evaluating the modulus of subgrade reaction for slab foundations using plate-load-based correlations corrosion guidance. If groundwater is aggressive, buried steel, rebar, or other foundation components can deteriorate even when the soil looks strong enough on paper.
Where buyers get caught off guard
The weak point often shows up on sites with suspected corrosive soils, perched water, or mixed fill. Many consumer guides stop at settlement and bearing, but chemistry and water placement often control long-term durability. California DOT's corrosion guidance says corrosivity sampling should represent the depth of the proposed foundation, with a near-surface sample, samples at significant subsurface changes, and a groundwater-table sample when relevant, because composite samples can dilute corrosivity signals corrosion sampling guidance.
That matters on barndominium projects because slab-on-grade details often rely on reinforcing steel, embedded metal, and tight control of moisture movement. A site can have enough bearing strength and still create a long-term maintenance problem if the soil chemistry is aggressive or if a perched water layer keeps parts of the slab wet. The engineer may know the ground can carry the load, but not whether it can preserve the structure.
A buyer who treats the report as a simple bearing test misses half the decision. The better question is whether the report protects both strength and durability.
How Many Borings Are Enough on a Rural Barndominium Lot
A rural barndominium lot can fool a buyer fast. One corner may be firm native soil, while another corner sits on old fill, soft clay, or ground that stays wetter after rain. A creek edge, a driveway bench, a former pasture low spot, and a raised pad can all behave like different sites, even inside one parcel.
Sampling density should match site variability
New Tech Geo's guidance is direct, do not rely on “just one or two samples,” and a typical house lot should have at least three to five borings boring guidance. That advice fits barndominium sites because they are often larger, less uniform, and more likely to hide changes in soil and moisture from one end of the lot to the other. As the ground becomes more variable, the boring pattern needs to become denser.
The goal is not to scatter holes blindly. It is to give the engineer enough coverage to catch weak zones, perched water, and pockets of mixed fill that a single convenient test point would miss. If the spacing is too wide, the report may describe the ground under the drill rig while missing the soil that will support the slab edge, the column line, or the driveway approach.
Checking a barn floor for rot is a good comparison. One solid board near the doorway does not prove the whole floor is sound. A sparse soil program can do the same thing, it can make a bad zone look invisible until construction starts.
Ask about depth and spacing, not just testing
The boring count still leaves an important question open. How deep did the crew go, and how far apart were the tests? A shallow program can miss a soft layer below a stiffer crust, and that hidden layer is where settlement problems often start. Foundation work usually samples at regular intervals or at each change in stratum, so the investigation can track the vertical profile instead of stopping at the easy part near the surface.
That is the same reason boring depth matters on rural lots. A site can look uniform from grade, yet change quickly below the topsoil. Engineers also use deeper investigation to check for bearing issues, settlement potential, and saturated layers that can affect slab-on-grade performance.
On rural lots, the issue is often not whether testing happened. It is whether the test plan matched the ground.
A buyer can ask two simple questions and learn a lot. How many borings did you place, and what changes in soil or groundwater did they capture? If the answers stay vague, the investigation may be too thin for a steel-frame building that depends on a slab performing the same way across the whole footprint.
Reading Your Geotechnical Report Without an Engineering Degree
A geotechnical report can look intimidating, but most of it comes down to a few decisions a buyer needs to understand. Start with the recommendation page, then work backward into the boring logs if something doesn't make sense. The goal is to spot what the engineer wants the builder to do, and why.
The pages that matter most
Look first for soil classification, bearing capacity, groundwater depth, settlement analysis, and recommendations. Those are the parts that shape the foundation decision. A report may say the soil can support a spread footing, but also warn about settlement, seasonal groundwater, or a weak layer at depth that changes the design.
Boring logs are the vertical record of what the drill found at each test point. They're useful because they show how the soil changes by depth, not just at the surface. If one layer reads dense and the next layer drops to soft or loose material, that's a red flag even if the top looks fine from the outside.
What's mandatory and what can flex
Some recommendations leave room for choice, others don't. Minimum footing depth, required bearing pressure, drainage provisions, and corrosion-related precautions should be treated as mandatory unless the engineer revises them. Foundation style can sometimes vary, though, which is why a report may allow more than one solution if each one meets the same soil constraints.
Bring the report to the builder and ask which recommendations affect price, schedule, and scope.
That conversation is where many buyers save themselves confusion. A builder might prefer a monolithic slab because it's familiar, while the report may steer the project toward a stem wall, deeper support, or moisture control measures. If the report mentions high groundwater or a soft layer below a hard crust, don't let anyone skim past it.
A good rule is this, if you can point to the line in the report that drove the foundation choice, you're reading it correctly. If you can't, ask the engineer to translate it before the pour begins.
Foundation Options and Remediation Strategies by Soil Condition
The best foundation is the one that fits the soil, not the one the builder happens to like best. On good ground, a straightforward slab may be enough. On marginal ground, the engineer may ask for deeper support or soil improvement. On poor ground, the right answer may be to bypass the problem entirely.
| Soil Condition | N-Value Range | Bearing Capacity | Recommended Foundation | Remediation if Needed |
|---|---|---|---|---|
| Very soft or loose | 0–4 | 5–8 T/sq.m | Deep support or engineered alternative | Over-excavation, replacement, or stabilization |
| Medium soil | 10–30 | 15–25 T/sq.m | Spread footing or slab system | Localized improvement if weak zones appear |
| Dense ground | 30–50 | 25–40 T/sq.m | Slab or shallow foundation options | Usually limited, but check moisture and chemistry |
| Rock or refusal | Refusal | 100+ T/sq.m | Direct foundation support possible | Design around bearing surface and excavation limits |
Matching the system to the ground
A monolithic slab often works best on uniform, competent soil with predictable moisture behavior. A stem wall slab gives more flexibility when the finished floor needs to sit above grade or when the design needs a better transition between soil and structure. Pier and beam or drilled pier systems can make sense when the upper soils are weak and the load needs to move to deeper, stronger material.
When the soil doesn't cooperate, remediation can change the site before the foundation is built. Common strategies include over-excavation and replacement, soil stabilization with lime or cement, compaction grouting, and engineered fill. Each one has trade-offs in schedule, cost, and construction complexity, so the engineer's recommendation should drive the choice, not the contractor's default preference.
For a buyer comparing bids, that's the key issue. Two foundation prices can look similar on paper while one assumes better soil than the report found. If the geotechnical report asks for specific remediation, the foundation bid has to include it or the comparison isn't real.
You can also use a builder shortlist to see who regularly works from engineered foundation documents, including concrete foundation specialists. That doesn't replace the report, but it helps you find teams that are less likely to improvise when the soil says otherwise.
How to Hire a Geotechnical Engineer and Coordinate with Your Builder
Start with a licensed geotechnical engineer who has local experience and has worked on rural or agricultural sites before. Barndominium properties often combine open land, fill areas, drainage changes, and mixed usage, so local knowledge matters. The engineer should understand not just the building footprint, but also the kind of structure you're planning, including steel-frame or post-frame details.
A simple workflow that keeps the project aligned
- Describe the building clearly. Tell the engineer the planned footprint, framing type, slab or pier intent, and any heavy interior loads.
- Give site context. Share what you know about drainage, past grading, visible fill, nearby water, and access limits.
- Ask for the sampling scope. Make sure the boring layout matches the site's variability, not just the easiest drill point.
- Review the report before pricing. The foundation bid should reflect the report, not the builder's assumptions.
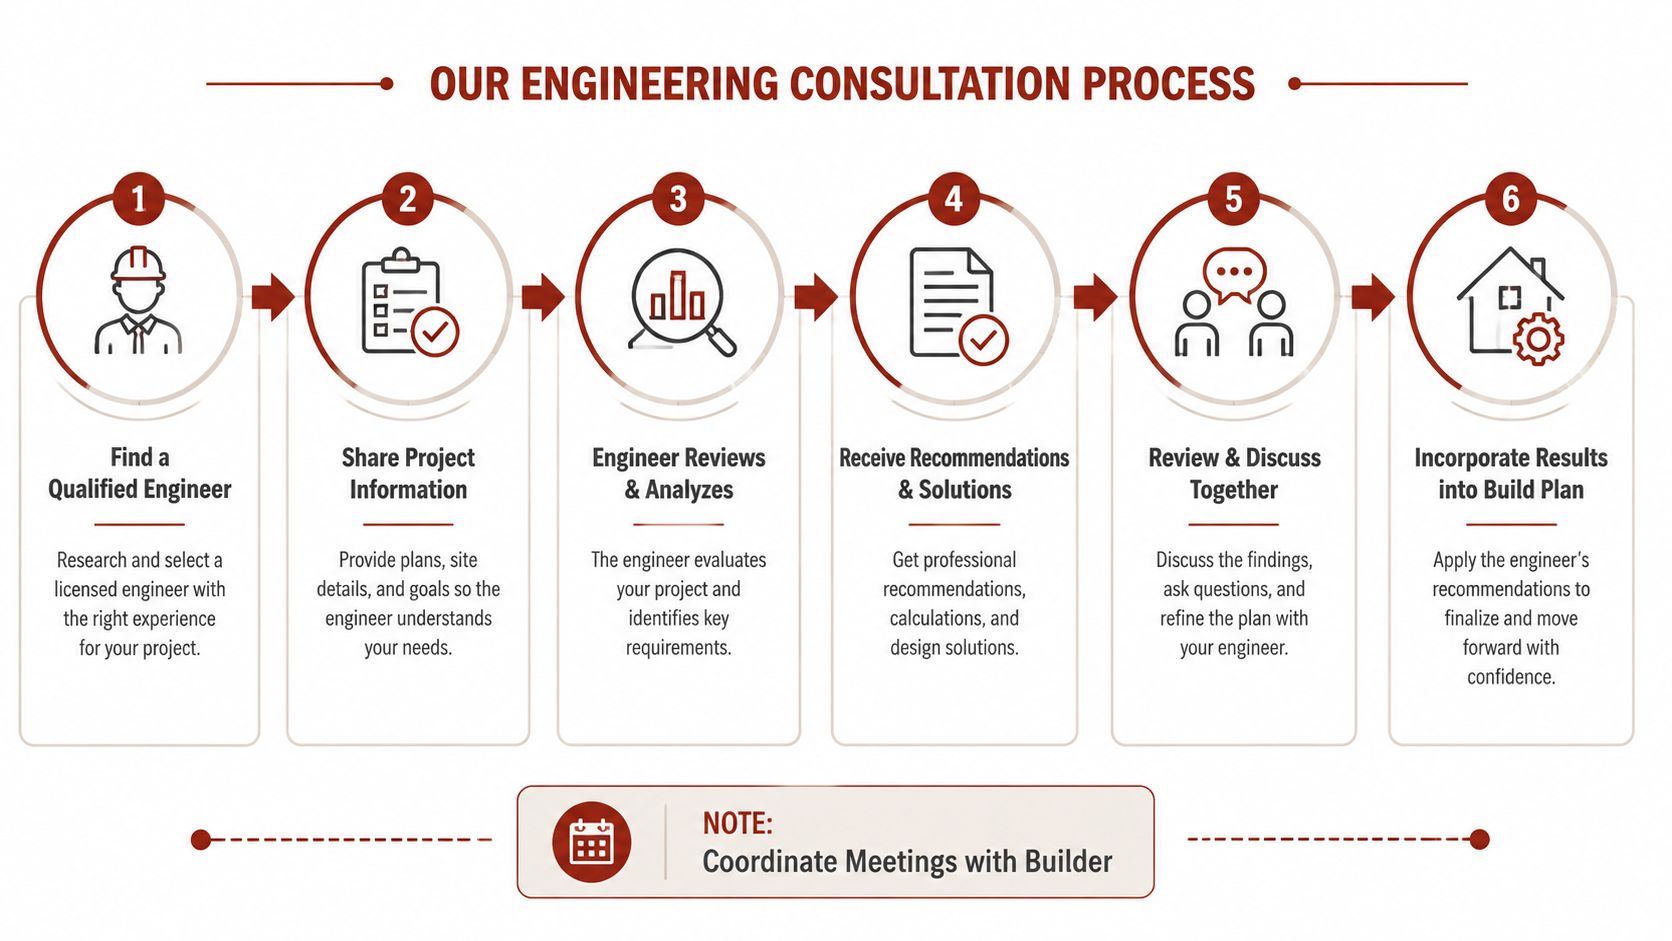
- Hold a coordination meeting. The engineer and builder should review the recommendations together before work starts.
- Keep the report with the build file. That way the foundation crew follows the same document from bid to pour.
The builder should be pricing the soil report, not negotiating it away.
The handoff matters. Share the geotechnical report with the builder and ask how it changes foundation type, excavation depth, drainage details, and reinforcement. If the builder proposes a cheaper substitute, ask whether it still satisfies the engineer's recommendations in writing.
For buyers who want sharper questions for that conversation, this builder question guide is a useful companion. The cleaner the communication, the lower the chance that the site gets built around guesswork instead of soil data.
If you're planning a barndominium and want to compare builders who can work from engineered foundation documents, visit BarndoBuilderList. It's a research-driven directory that helps you narrow the field before the first call, so you can focus on builders who understand site prep, soil reports, and the foundation decisions that protect a steel-frame home for the long haul.
- soil testing
- foundation design
- barndominium
- geotechnical report
- site preparation