Framing Inside a Metal Building: A Practical Guide
Learn how to handle framing inside a metal building, from stick vs. steel stud choices to attachment, clearances, insulation, and avoiding common pitfalls.
You're standing inside a bare metal shell with a concrete slab under your boots, steel columns at the perimeter, and a stack of lumber waiting outside. The floor plan may look simple on paper, but the first stud you set can affect plumbing access, insulation continuity, cabinet strength, drywall movement, and condensation control. Framing inside a metal building works best when you decide where the thermal envelope belongs before choosing the wall material.
A metal shell isn't automatically a finished interior wall system. Interior partitions are typically separate, non-load-bearing walls anchored to the slab and selectively tied to girts or purlins, as described in this metal-building interior framing guide. The shell carries its own building loads, while the new walls must handle their own finish materials, fixtures, and movement.
Table of Contents
- Walking Into Your Metal Building Shell for the First Time
- Choosing the Right Interior Framing System
- Laying Out and Anchoring the Interior Walls
- Tying Interior Framing to the Steel Structure
- Managing Vapor, Insulation, and Thermal Bridging
- Planning for Cabinets, Doors, and Hanging Loads
- Final Inspection and Common Pitfalls to Catch
Walking Into Your Metal Building Shell for the First Time
On day one, a barndominium owner usually sees an open room, not a wall system. The slab is marked only by anchor bolts and column lines. Horizontal girts run between the main columns, roof purlins cross overhead, and every future room still exists as a pencil line on a plan.
Before ordering studs, mark the kitchen, bathrooms, utility room, mechanical chase, and stair location. A bathroom wall needs dependable plumbing access. An air handler needs service clearance. A stair needs more than a convenient opening, because its stringers, landing, guard, and headroom all affect nearby partitions. Wall placement driven only by appearance often creates awkward pipe runs and expensive changes later.
Decide where the envelope belongs
The first major choice is whether the interior perimeter walls will sit tight against the existing steel or stand independently farther inside the shell. A wall placed against the steel can preserve floor area, but it must coordinate with girts, insulation, thermal breaks, and the irregular plane of the exterior skin. A free-standing wall set inboard can create a cleaner conditioned envelope, giving insulation and air-sealing layers a more controllable surface.
That choice also changes how you detail the ceiling and corners. Steel framing can create thermal bridges, so technical guidance emphasizes thermal-break detailing and, in some jurisdictions, continuous insulation or equivalent measures. The correct vapor-control strategy depends on whether the new wall remains inside a conditioned envelope or sits directly against an unconditioned metal skin, as explained in this technical guide to thermal bridging requirements.
Leave the walkthrough with measured facts
Use a laser, tape, and chalk line rather than trusting the plan alone. Check:
- Column locations: Measure each main column from fixed slab references and check whether it's plumb.
- Vertical clearances: Record slab-to-purlin height, ceiling drops, and any low framing.
- Wall offsets: Mark both perimeter options, tight to steel and set inboard.
- Service zones: Locate plumbing walls, electrical panels, HVAC equipment, drains, and future chases.
- Openings: Note every door, window, stair opening, and garage-to-house transition.
- Slab conditions: Identify high spots, cracks, step-downs, slopes, and saw cuts.
- Attachment points: Photograph girts, purlins, columns, braces, and panel seams.
If you're still comparing shell contractors, review builders with relevant barndominium experience through BarndoBuilderList's shell builder search before finalizing the interior layout. The shell and interior framing teams need to understand the same load, clearance, and envelope decisions.
Choosing the Right Interior Framing System
Set the thermal envelope before choosing the wall material. A partition that looks straight on the slab can still leave a cold, condensation-prone perimeter if it sits in the wrong heat-flow path. Once the envelope location, insulation depth, and service space are clear, match the framing system to the crew, the room, and the loads.
| System | Material Cost | Skill Level | Best Application | Choose It When |
|---|---|---|---|---|
| Stick wood framing | Often simpler to source and work with | Familiar residential framing skills | Kitchens, bedrooms, cabinets, and owner-built interiors | The crew is DIY or the wall needs simple blocking, trim, and cabinet backing |
| Cold-formed steel studs | Requires compatible tracks, screws, and cutting tools | More precise layout and metal-framing skill | Moisture-prone rooms, shops, garages, and straight non-load-bearing partitions | Moisture resistance and consistent straightness matter more than easy field alterations |
| Post-frame tie-in | Depends on engineered posts, beams, and connections | Structural layout and connection knowledge | Lofts, stairs, storage platforms, or concentrated loads | The interior wall will transfer a planned load rather than only divide rooms |
Published practice notes identify 25-gauge and 20-gauge cold-formed steel studs as common choices for non-load-bearing partitions. Self-drilling screws connect the track and studs, and girt spacing affects how much separate drywall backing the wall needs. Use the framing layout and the planned wall finish together, rather than selecting a stud size from appearance alone.
Where wood earns its keep
Wood is practical for cabinet-heavy interiors and crews that already own the tools. A wood stud wall gives installers a familiar surface for cabinet backing, blocking, door jambs, trim, and plywood utility panels. DIY builders can also adjust it more easily during rough-in, which reduces the cost of small layout changes.
The perimeter requires more care. Pressing a wood wall against steel does not control condensation by itself. Keep the wall assembly outside the conditioned envelope when that is the design intent, or provide the continuous insulation and thermal separation needed to keep cold steel from turning into an interior moisture problem.
Where steel makes more sense
Cold-formed steel suits bathrooms, garages, and shop areas where moisture and dimensional movement are concerns. It stays straight, but the crew must place screws consistently and plan for electrical boxes, backing, and heavy fixtures before closing the wall. A steel stud also conducts heat readily, so its position relative to the insulation and exterior members matters more than the stud's clean appearance.
Post-frame tie-ins belong in the structural portion of the plan. If a loft or stair transfers load into an interior wall, check the slab, posts, beams, connections, and shell for that specific duty. A normal partition is not a substitute for engineered support.
Choose the system your crew can install accurately, then confirm that choice against the thermal envelope and the loads. That order prevents the common callback: a straight interior wall that leaves a cold perimeter or lacks backing where the finished room needs it.
Laying Out and Anchoring the Interior Walls
Start with the slab, not the exterior wall panels. Snap partition lines from reliable column or anchor-bolt references, because an exterior panel can be out of plane while the structural column line remains fixed. A laser makes it easier to transfer those lines across the building and identify where a planned wall will collide with a brace, drain, or step-down.
Run a long level or laser over the slab before installing track or plates. A high spot under the bottom plate can push the wall out of alignment, while a low area can leave a gap that weakens the anchor line and creates a sound path. Correct the substrate or plan a controlled shim and seal detail. Don't bury a bowed slab problem under drywall.
A reliable sequence
- Snap both faces of each wall. Mark door centers, jambs, corners, and changes in wall thickness before cutting material.
- Set the bottom plate or track. Use a pressure-treated bottom plate where wood framing meets concrete, or the specified steel track for cold-formed framing.
- Anchor deliberately. Powder-actuated fasteners can suit approved concrete conditions, while wedge anchors provide dependable restraint at door jambs and other high-demand locations. Sound-sensitive walls may need an adhesive-and-screw approach, subject to the project details.
- Set the first stud. Plumb it, square it to the layout, and brace it before filling the run.
- Fill the wall one stud at a time. Check spacing, openings, and service paths as the wall grows.
- Frame openings early. Install the correct jamb, header, and blocking before rough-ins make access difficult.
- Tie the partition selectively. Connect it to suitable girts, columns, or purlins without turning a partition into an unintended support for the shell.
Practical rule: Build the first stud accurately and brace it. A crooked first stud makes every later measurement look wrong.
Leave a controlled movement gap where the interior wall meets steel that can move independently. Don't hard-pack the partition against wall panels, roof framing, or braces without a detail that accounts for deflection and thermal movement. At a garage or mudroom step-down, stop the bottom plate at the transition, preserve the drainage and moisture-control detail, and frame the change in elevation instead of forcing the plate to follow an uneven surface.
Tying Interior Framing to the Steel Structure
Walk the shell before fastening a partition. Measure the girts, columns, and purlins, then mark where the interior studs can meet dependable steel. Girt spacing often falls at 4, 5, or 6 feet on center, while tighter 24- or 32-inch spacing can offer more direct drywall backing. Treat those dimensions as existing conditions to verify, not a universal installation schedule. The metal-building framing overview provides useful reference information, but the wall design and building drawings control the connection.
A track pressed against a wall panel is only a friction fit. Panel movement, vibration, and fastener pullout can loosen that partition after the finish work is complete. Use clip angles, blocking, or another approved detail to transfer lateral restraint into a suitable girt or column. Self-drilling screws generally suit thin steel edges better than powder-actuated fasteners, which can damage the panel or fail to develop reliable support.
Read the attachment as a load path
Keep the interior wall functioning as a partition. Anchor it to the slab and tie it to the shell for stability, while leaving roof, wind, and frame loads with the primary structure. Girts and purlins are secondary members that transfer loads to the main frame, as explained in this steel construction framing reference.
Confirm these points before closing the walls:
- Stud alignment: Set studs where clips and blocking can reach structural steel.
- Fastener selection: Match screws, bolts, or welds to the steel thickness and approved connection detail.
- Fastener pattern: Practice notes commonly place fasteners every 24 inches on center and within 2 inches of ends and joints. Follow the project detail where it differs.
- Member capacity: Verify that the girt or purlin can accept the attachment without receiving an unengineered load.
- Movement tolerance: Leave room for the partition and shell to move without cracking brittle finishes.
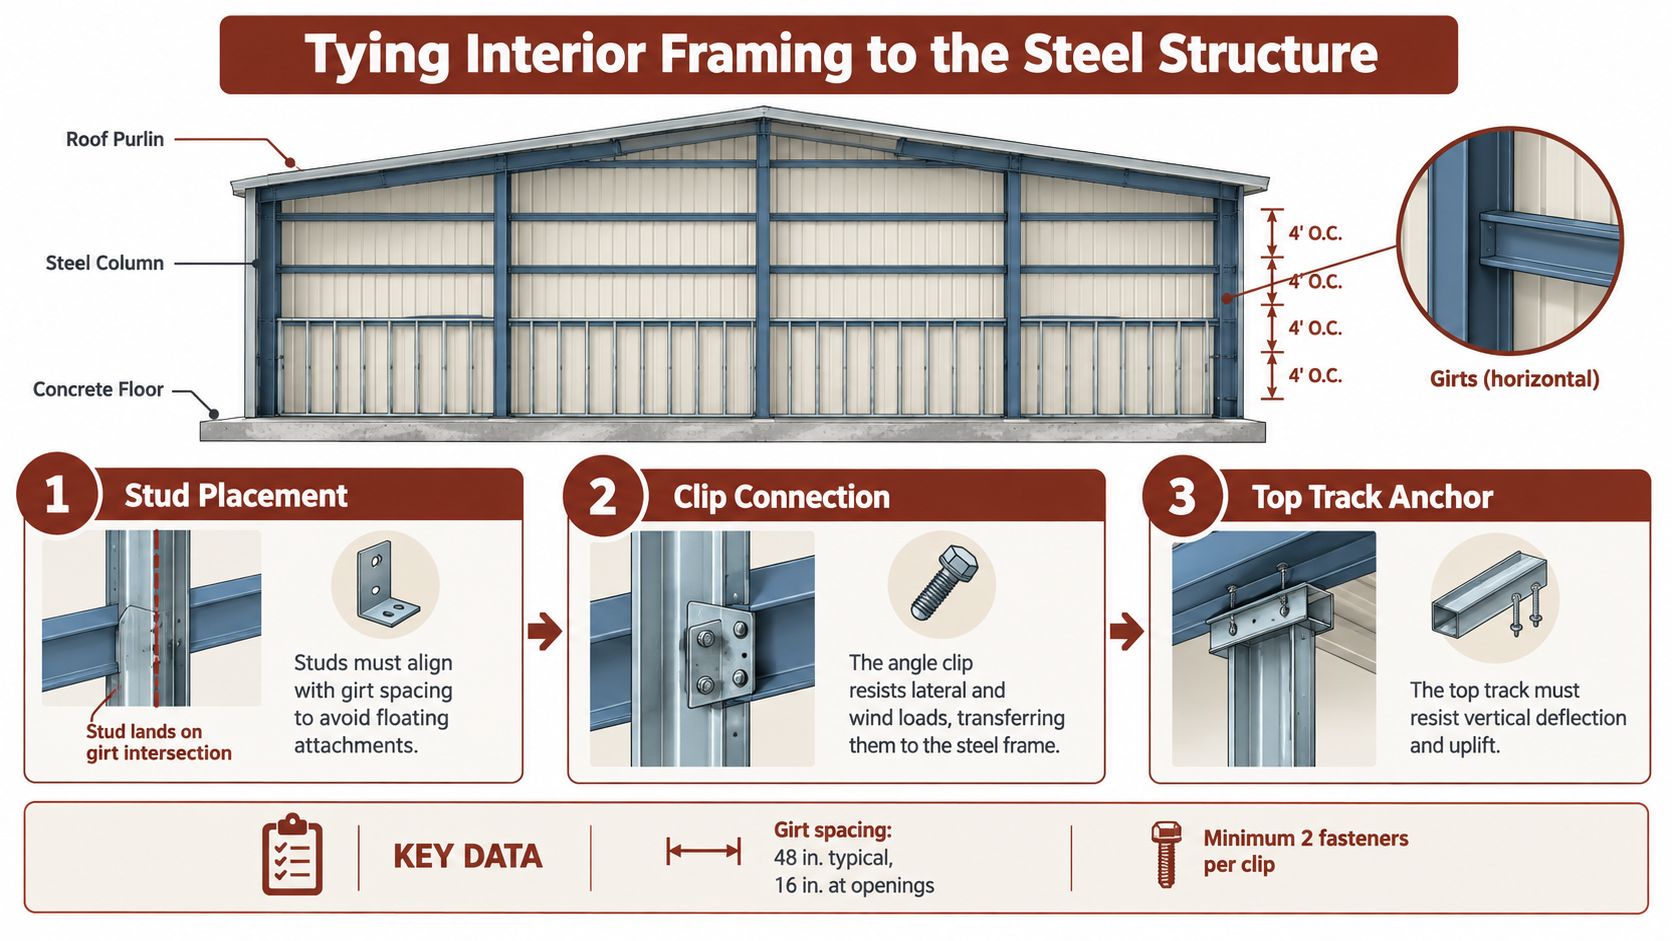
A connection that looks neat is not necessarily a sound load path. Before hiring, compare contractors who list shell dry-in building services and ask how they handle interior attachment. The inspector should see a documented connection strategy, not screws driven wherever the partition happens to meet the panel.
Managing Vapor, Insulation, and Thermal Bridging
A metal shell can feel dry during framing and still create condensation after the building is conditioned. Set the thermal envelope first, then choose the interior wall assembly that supports it. Insulation added after framing cannot correct a continuous steel path around the insulation, and a poorly sealed vapor retarder can leave warm, moist air against cold metal.
Climate, building use, and the location of the conditioned envelope determine the assembly. Options include closed-cell spray foam against the steel liner panel, fiberglass batts with a continuous interior vapor retarder over the framing, or a hybrid system. Follow the project's code requirements and place the vapor-control layer on the appropriate side for the local climate and assembly. Owners can also compare interior finish-out builder listings before selecting an installer.
Build the layer without gaps
Closed-cell foam follows irregular steel surfaces and limits air movement at the shell. Fiberglass batts perform when the cavity is full, dry, and fitted tightly around wiring and boxes. Do not compress batts around electrical work or leave narrow strips empty beside columns. Those gaps create cold surfaces inside an otherwise insulated wall.
For polyethylene assemblies, the metal-building interior guidance describes 6-mil polyethylene on the warm-in-winter side, with sealed seams and penetrations to reduce condensation risk. That placement still requires climate-specific review. A vapor retarder on the wrong side can trap moisture, especially where a new interior wall sits against an unconditioned metal skin.
Protect the difficult transitions
Seal the floor-to-wall joint, top plate, corners, column lines, and every pipe, wire, and duct penetration. Where a partition interrupts the exterior cavity, connect the air barrier deliberately. Otherwise, conditioned air can move behind the wall and reach cold steel at the interruption.
Steel framing also creates thermal bridges. Thermal-break details, continuous insulation, or equivalent measures may be required. Reducing exposed stud web area, adding foam at bridge points, or increasing insulation thickness can improve performance only when the layers stay continuous through corners, joints, and penetrations.
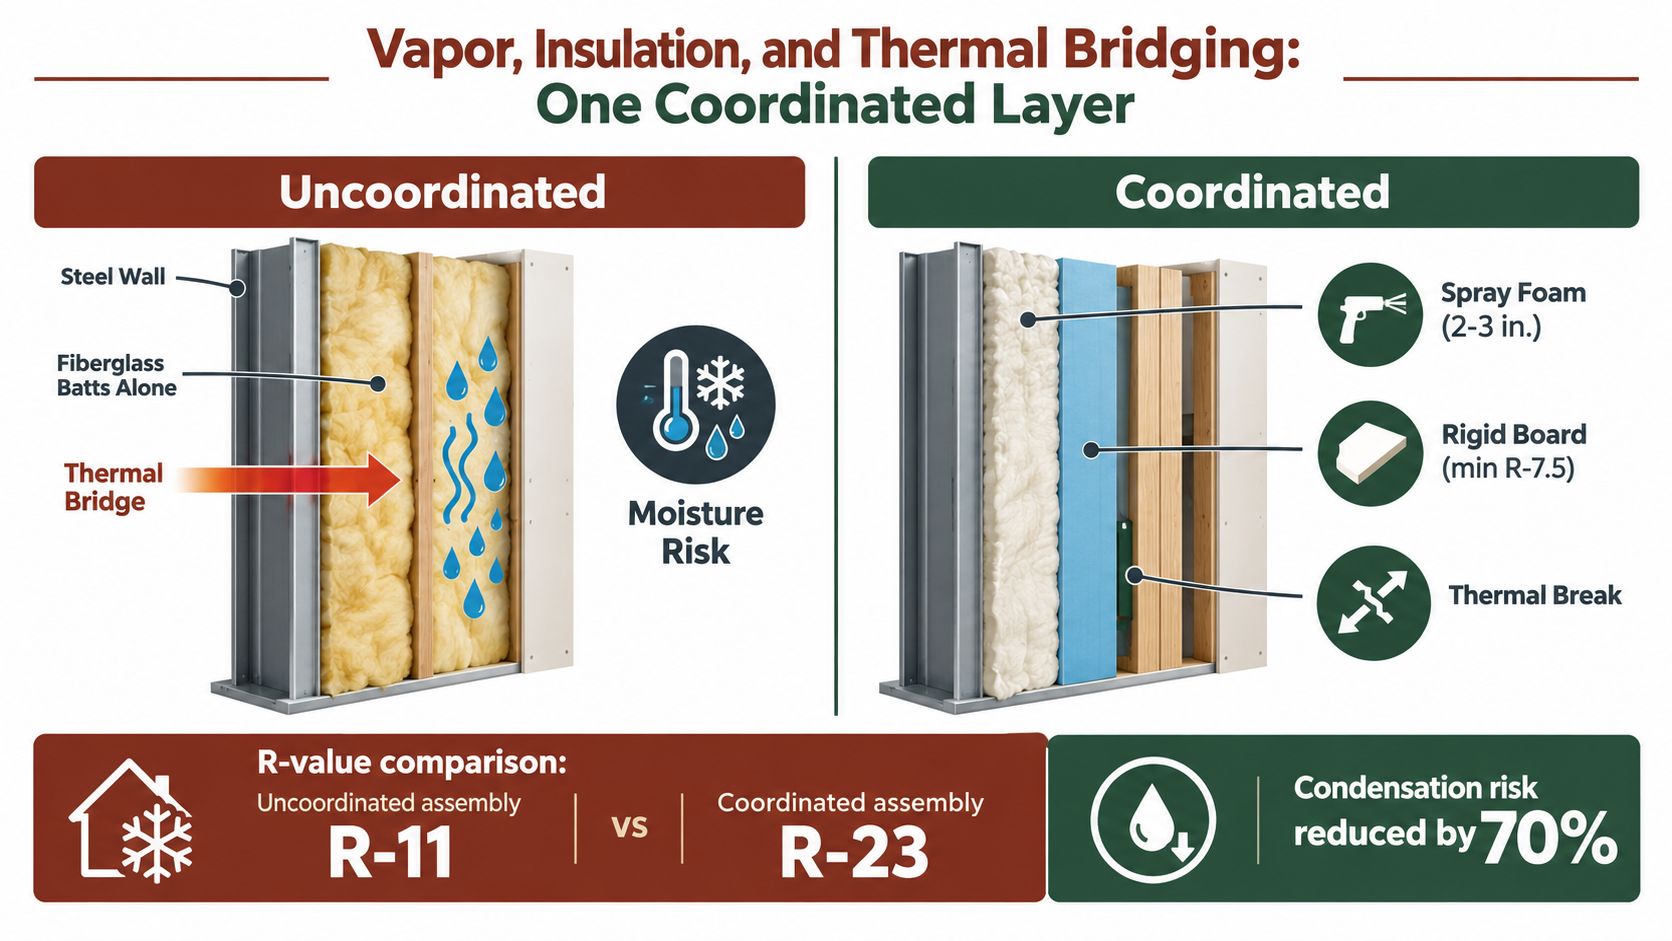
The need for a vapor barrier depends on the envelope location, climate, conditioning, and moisture sources. Have the wall assembly reviewed before insulation goes in. Fixing condensation after drywall closes the cavity usually means opening finished work, so confirm the layer order and continuity while every surface remains accessible.
Planning for Cabinets, Doors, and Hanging Loads
“Non-load-bearing” only answers one question. It means the partition isn't intended to carry the building's roof or wall loads. It doesn't mean the wall can accept every cabinet, barn door, television, mini-split, loft, or stair without added framing.
A kitchen wall needs continuous backing where upper cabinets will hang. Install plywood backing or solid blocking between studs, then fasten the cabinets into that backing with a pattern suited to the cabinet rail and wall system. Drywall anchors alone are a poor substitute for planned backing, especially when the owner expects the cabinet layout to change.
Plan the load before closing the wall
A sliding barn door creates concentrated force at the track and jambs. Frame the header and jamb with enough depth and blocking for the hardware specified, rather than guessing from the door's appearance. A television mount needs blocking at the mounting height, and a mini-split needs a solid mounting zone plus sealed line-set penetrations that won't compromise the air or vapor-control layer.
| Load Type | Minimum Framing Detail | Fastener or Anchor |
|---|---|---|
| Upper cabinets | Continuous plywood or solid blocking behind the cabinet rail | Fasteners into planned backing, not drywall alone |
| Barn door | Reinforced header, jambs, and hardware backing | Hardware fasteners sized for the framed connection |
| Television mount | Horizontal blocking at the mount height | Screws into blocking or structural backing |
| Mini-split indoor unit | Manufacturer-required mounting surface and service clearance | Approved anchors into framing or backing |
| Loft or mezzanine | Engineered beams, posts, joists, and slab connections | Designed bolted, screwed, or anchored connections |
| Stair stringers | Framed landing, concentrated blocking, and verified support below | Connectors selected for the actual stringer load |
A loft changes the entire load path. Its weight may travel through beams, posts, and slab anchors rather than through a normal partition. The same applies to a stair stringer that lands beside a wall. Confirm which member carries the force and whether the slab, shell, and connections were designed for it.
Reserve future capacity intelligently
Add backing where the owner has a clear future use, but don't assume extra blocking turns a partition into a structural frame. The building manufacturer, designer, or engineer should review any request for ceiling storage, hanging fixtures, lofts, or future mezzanines. That review is especially important where the shell's girts and purlins were not specified for added interior loads.
Final Inspection and Common Pitfalls to Catch
The cheapest inspection happens before the drywall truck arrives. Walk the building in reverse order from the finished surface. Stand in every room, look up, look down, and inspect every penetration while the framing, insulation, and connections remain visible.
A flashlight exposes gaps that daylight misses. Run your hand along the bottom track, check the top of each wall, and compare the installed studs with the girt layout. A partition can look straight from across the room while its top plate fights the ceiling grid or its end connection misses the steel member entirely.
Use a reverse punch list
- Look up first. Check roof penetrations, insulation coverage at the eave, top-track anchors, ceiling drops, and any place conditioned air meets cold steel.
- Look down next. Verify bottom-plate anchors, track continuity, slab step-down details, moisture barriers, and gaps that could admit air or water.
- Inspect every wall. Confirm stud spacing, plumbness, opening dimensions, blocking, clip connections, and fastener patterns.
- Trace the services. Look for screws near plumbing and electrical runs, protected penetrations, and sealed ducts, wires, and line sets.
- Review the assembly. Confirm the vapor retarder is continuous, insulation fills the intended cavities, and thermal breaks remain intact.
- Document before closure. Photograph each wall cavity, opening, connection, and service route for the owner's records.
Before drywall: A missing cabinet block is annoying. A screw through a concealed pipe or a torn vapor retarder can become a demolition job.
Check fire-rated assemblies around utility rooms against the approved drawings, and use the specified fire-rated sealant where the assembly requires it. Don't substitute ordinary caulk because the penetration looks small. The wall's rating depends on the complete tested or approved assembly, not on one layer viewed in isolation.
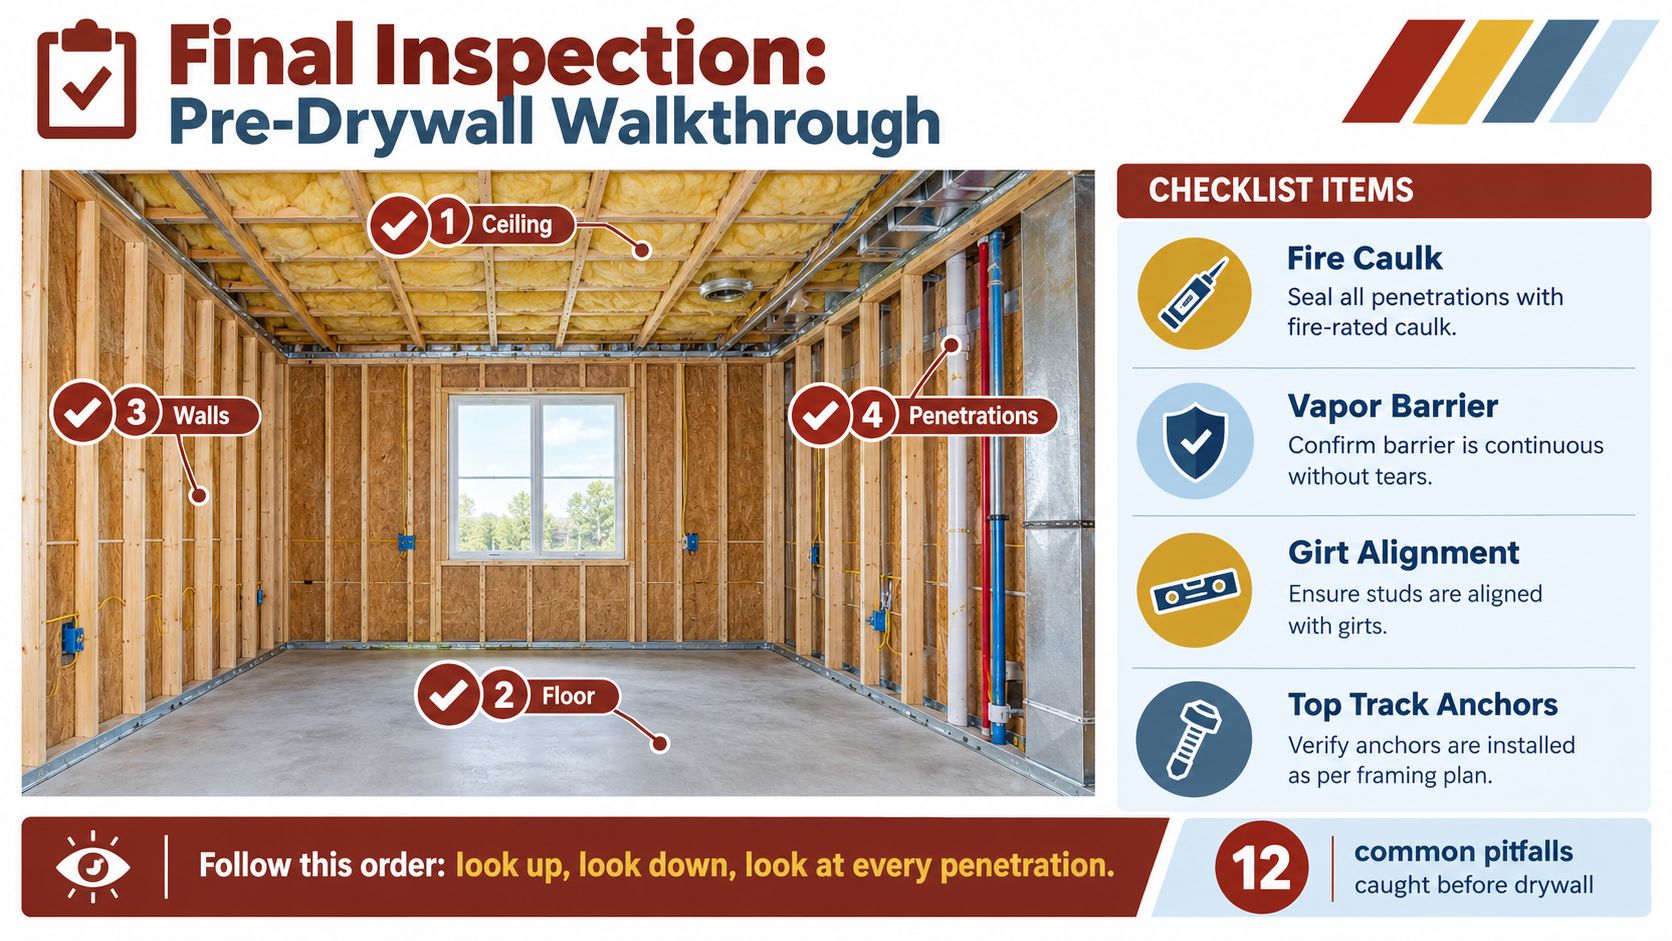
The recurring callbacks are predictable: poor layout, out-of-square openings, missing backing, insulation gaps at the eave, loose perimeter connections, and an incomplete vapor barrier. The hour spent walking the shell with a flashlight and notepad protects you from drywall tear-outs, cold-wall complaints, moisture damage, and disputes about whether the shell or interior crew owned a missed detail.
BarndoBuilderList helps buyers compare barndominium-friendly builders by location, scope, and documented website signals, including companies associated with metal-building erection and interior framing work. Visit BarndoBuilderList to build a cleaner shortlist, compare shell and turnkey responsibilities, and contact candidates before your interior wall and thermal-envelope decisions are locked in.
- metal building framing
- interior framing
- steel stud framing
- barndominium framing
- metal building insulation