Framing a Barndominium: Methods and Builder Tips
Master framing a barndominium with this practical guide. Compare post-frame, stick, and metal methods, learn the build sequence, and vet the right builder.
“Choose the cheapest framing method” is popular barndominium advice. It's also incomplete. The frame affects far more than the shell price. It determines how the building handles wind and snow, where insulation can go, how utilities reach rooms, whether drywall has reliable backing, and whether the finished home can pass inspection.
The hidden risk is coordination. Builders sometimes design the exterior shell as one project and the interior living space as another. That approach can leave steel members, girts, posts, slab edges, insulation, vapor control, and interior walls fighting for the same space. A barndominium succeeds when the shell and residential interior are engineered as one building from the beginning.
Table of Contents
- Comparing the Three Main Barndominium Framing Methods
- Structural Anatomy of a Post-Frame Build
- The Construction Sequence from Foundation to Shell
- Integrating Interior Framing and Insulation
- Navigating Code Compliance and Structural Pitfalls
- Vetting Builders and Finalizing Your Framing Plan
Comparing the Three Main Barndominium Framing Methods
Most barndominiums use one of three structural approaches: post-frame construction, traditional light-frame wood construction, or a pre-engineered metal building system. None is automatically right for every site. The correct choice depends on the desired clear span, foundation design, local loads, insulation plan, interior layout, and the builder's experience with residential work.
Light-frame wood is the national residential default. One neutral source reports that better than 90% of homes built in the United States use wood framing (Forum Holzbau research). That doesn't make conventional stick framing the only sensible option, but it does mean local designers, inspectors, and trades generally understand its residential details.
Post-frame construction
Post-frame buildings use widely spaced primary posts, roof trusses, wall girts, and roof purlins. The system creates broad open areas with fewer interior structural walls, which suits a house-and-shop layout or a large great room. It also lets the builder separate the exterior structural frame from interior non-load-bearing partitions.
The trade-off is that the wall assembly needs careful detailing. The post spacing may work well for the shell but not provide the continuous, predictable backing that drywall, cabinets, and utility runs require. Insulation, air sealing, and moisture control must be designed around the posts, girts, slab, and interior wall system.
Traditional stick framing
Conventional wood framing gives the residential designer a familiar wall assembly. Stud spacing, sheathing, windows, electrical boxes, plumbing chases, and drywall backing follow established practice. It's often a practical choice when the project resembles a conventional home more than a shop with living quarters.
The limitation is structural flexibility. Large open areas and attached shop spaces may require engineered beams, headers, posts, or trusses that reduce the simplicity of the basic wall system. Material use and labor also change as the design adds wider spans, taller walls, or complex roof geometry.
Pre-engineered metal buildings
A pre-engineered metal building uses a manufacturer-designed steel frame, often with rigid frames and metal wall and roof panels. It can provide substantial open space and a clear structural concept for large shops or mixed-use buildings.
Residential adaptation requires more than selecting a kit. The frame, connections, openings, foundation, insulation, interior partitions, and finish systems must work together. A building designed for one jurisdiction or loading condition may not suit another, and the interior residential package can become the difficult part if the original design focused mainly on an agricultural or commercial shell.
| Framing method | Clear-span potential | Residential adaptability | Primary cost driver |
|---|---|---|---|
| Post-frame | Strong option for broad open layouts, subject to engineered members and loads | High when interior framing and envelope details are coordinated early | Foundation, posts, trusses, secondary framing, and residential finish integration |
| Traditional stick framing | Flexible for typical residential rooms, with larger openings requiring engineered support | Familiar to residential trades and inspectors | Lumber, labor, engineered beams, and complexity of wide or tall spaces |
| Pre-engineered metal building | Strong option for large open shop areas | Depends heavily on local engineering and the interior wall and insulation package | Steel frame, foundations, connection details, local design loads, and interior build-out |
The best comparison isn't “wood versus steel.” It's which system gives your project a complete, permit-ready path from foundation to drywall. A low shell price means little if the interior framing, insulation, mechanical coordination, and code documentation are unresolved.
Structural Anatomy of a Post-Frame Build
A post-frame building carries loads through a different path than a conventional stud-framed house. Roof loads move through trusses into primary posts, and those posts transfer forces into the foundation, engineered piers, or slab connections. Secondary members then support the cladding and distribute loads back to the primary frame.
The post is only one part of the system. Wall girts run between primary posts, while roof purlins support the roof assembly and help transfer roof loads. Their size, orientation, spacing, and connection details affect not only structural performance but also the way insulation, interior framing, wiring, and drywall can be installed.
Why secondary framing matters
A common post-frame layout places primary posts at roughly 8 to 12 feet on center, then uses wall girts and roof purlins to support the exterior panels and carry loads back to the main frame (National Frame Building Association framing guidance). That spacing can produce an efficient shell, but it also creates a coordination decision for the interior.
If the girt layout doesn't align with the planned insulation and drywall system, the crew may need to add blocking, furring, or supplemental framing after the shell is already closed. That work is slower and less reliable than designing the backing before fabrication. It can also disturb air barriers, create uneven wall planes, and complicate electrical and plumbing routes.
Practical rule: Secondary framing should be reviewed against the interior finish plan, not only against the siding and roof panels.
Post-frame construction became more than a simple agricultural shelter through decades of engineering development. The National Frame Building Association describes the system's evolution into a finely tuned engineered method in the late 1970s through the mid-1980s, with diaphragm design work in the 1980s through the mid-1990s improving structural efficiency for residential applications (National Frame Building Association history).
That history matters because a modern residential post-frame building is not just a pole barn with finished rooms. It is a coordinated structural and enclosure system. The engineer must account for the frame, cladding, openings, foundation, lateral resistance, insulation strategy, and the interior wall system as connected parts.
The Construction Sequence from Foundation to Shell
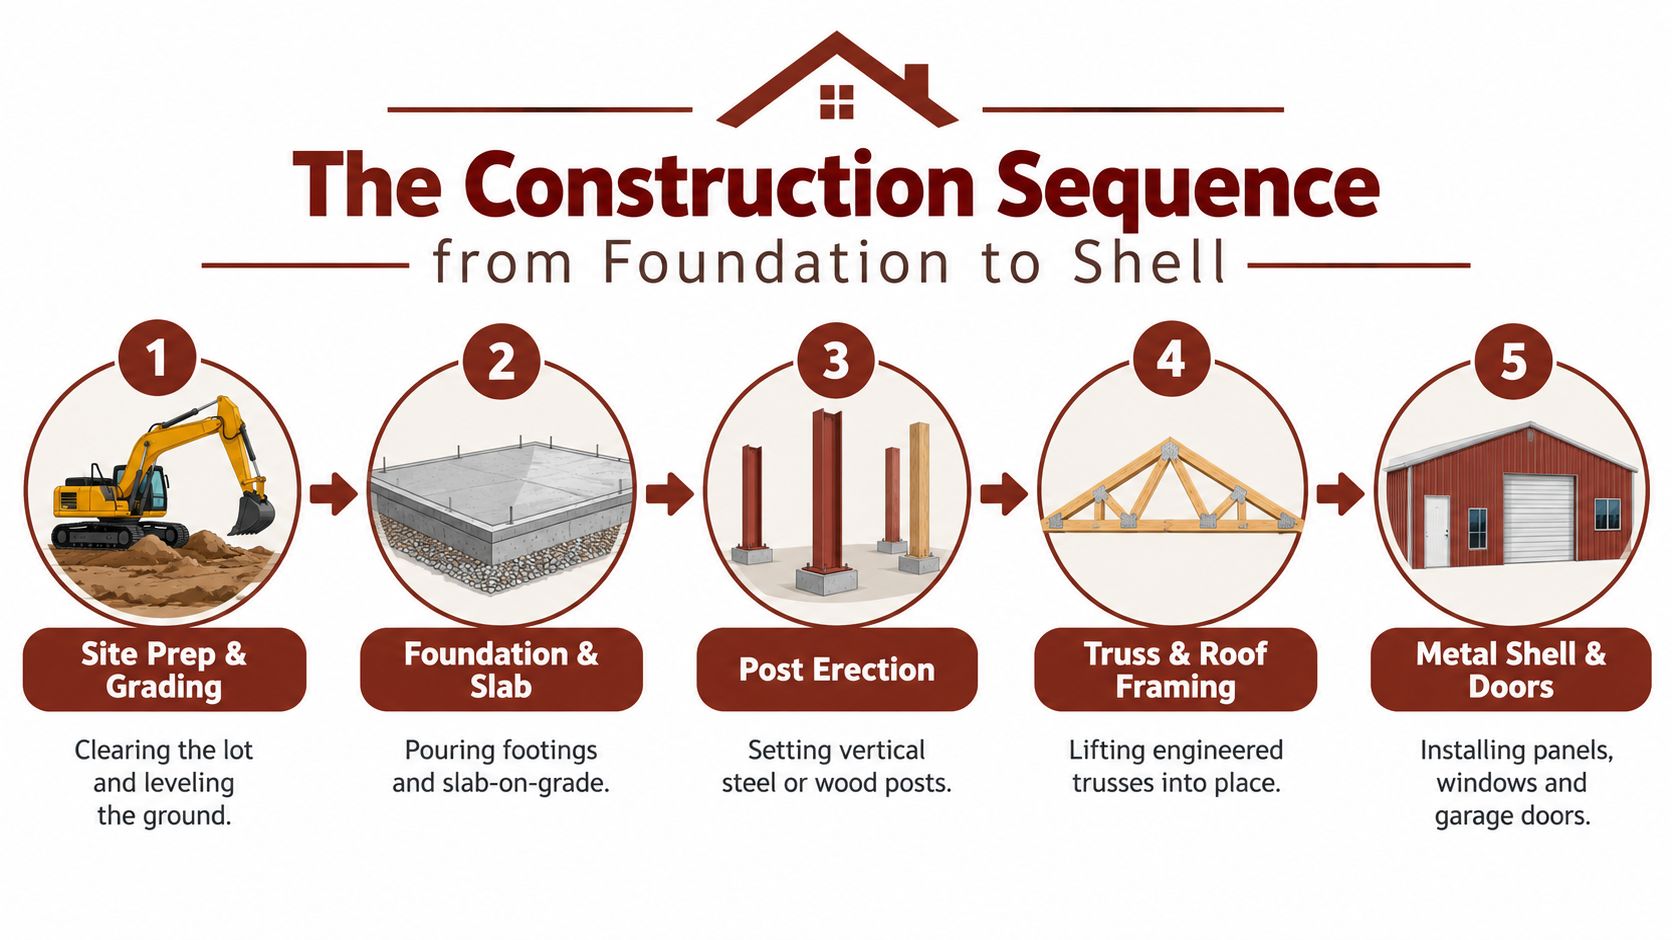
A post-frame shell moves quickly only when the sequence is planned before materials arrive. The crew needs a stable site, correct elevations, approved drawings, coordinated openings, and a clear inspection plan. Rushing one trade ahead of another usually shifts the problem into a later phase, where correction costs more.
Begin with site control
The first work is clearing, grading, drainage, access, and layout. The surveyor or builder should establish building corners, finished floor elevation, driveway access, and the locations of utilities before excavation begins. A shell can be structurally correct and still create expensive problems if the finished floor sits too low for site drainage or if service routes conflict with future rooms.
The foundation design follows site conditions and the structural system. Depending on the engineered plan, primary posts may extend below frost depth or connect to engineered piers or slab assemblies. The connection details matter. They should identify reinforcement, anchors, brackets, embedment, concrete requirements, and moisture protection rather than leaving the crew to interpret a generic shell drawing.
Place the frame before closing the building
After the foundation or slab reaches the required condition, the crew sets the primary posts and braces them temporarily. Alignment and plumb should be checked before trusses are lifted. A small error at this stage can multiply across wall lines, roof planes, door openings, and interior partitions.
The next sequence typically includes engineered trusses, permanent bracing, wall girts, and roof purlins. The primary posts, trusses, and secondary members form a load path. The crew shouldn't install exterior panels until the frame geometry and required connections have been inspected and confirmed.
Hold points protect the schedule
Inspections vary by jurisdiction, but the project team should identify hold points before work starts. Typical checkpoints may involve the foundation, reinforcement, post or pier installation, structural connections, framing, rough plumbing, rough electrical, insulation, and final enclosure. The exact list belongs to the local building department and approved plans.
Plumbing requires special planning in a slab-based barndominium. Under-slab drains, water lines, sleeves, floor drains, and conduit paths may need to be installed before the concrete is poured. A conventional house can sometimes hide service routes inside framed floors or basement ceilings. A slab-on-grade design offers fewer opportunities to correct a missed penetration later.
Before concrete: Confirm every under-slab drain, sleeve, conduit, utility entry, floor drain, and equipment location against the current floor plan.
Close the shell deliberately
Once the structural frame and secondary members are accepted, the crew can install roof panels, wall panels, windows, doors, flashing, and other weather-exposed components. Openings must match the approved structural details. Large overhead doors, porch connections, dormers, and window groups can require additional framing that should be included before panels are ordered.
Material deliveries should follow the erection sequence. Keep posts, trusses, panels, fasteners, insulation, and interior materials organized so lifting equipment and workers aren't forced to operate around scattered stock. Builders who specialize in residential shells can be compared through barndominium shell builders near you, but the buyer still needs to confirm exactly what the quoted shell includes.
A weather-tight exterior doesn't mean the building is ready for residential finishes. The team should verify roof and wall penetrations, flashing, window installation, slab-edge conditions, drainage, and the planned air and thermal barriers before interior framing begins.
Integrating Interior Framing and Insulation
The most expensive framing mistake is treating the shell and the living space as unrelated jobs. The exterior frame may stand correctly while the interior walls leave gaps in insulation, obstruct mechanical runs, or fail to provide drywall backing at the places where the finished home needs it.
Residential interiors are often built with conventional 2x6 studs at 16 or 24 inches on center, creating deeper insulation cavities and utility chases (Rural Builder construction survey). These interior walls are commonly non-load-bearing inside the post-frame shell. That gives the designer flexibility, but it doesn't remove the need for precise coordination.
Draw the wall assemblies before ordering materials
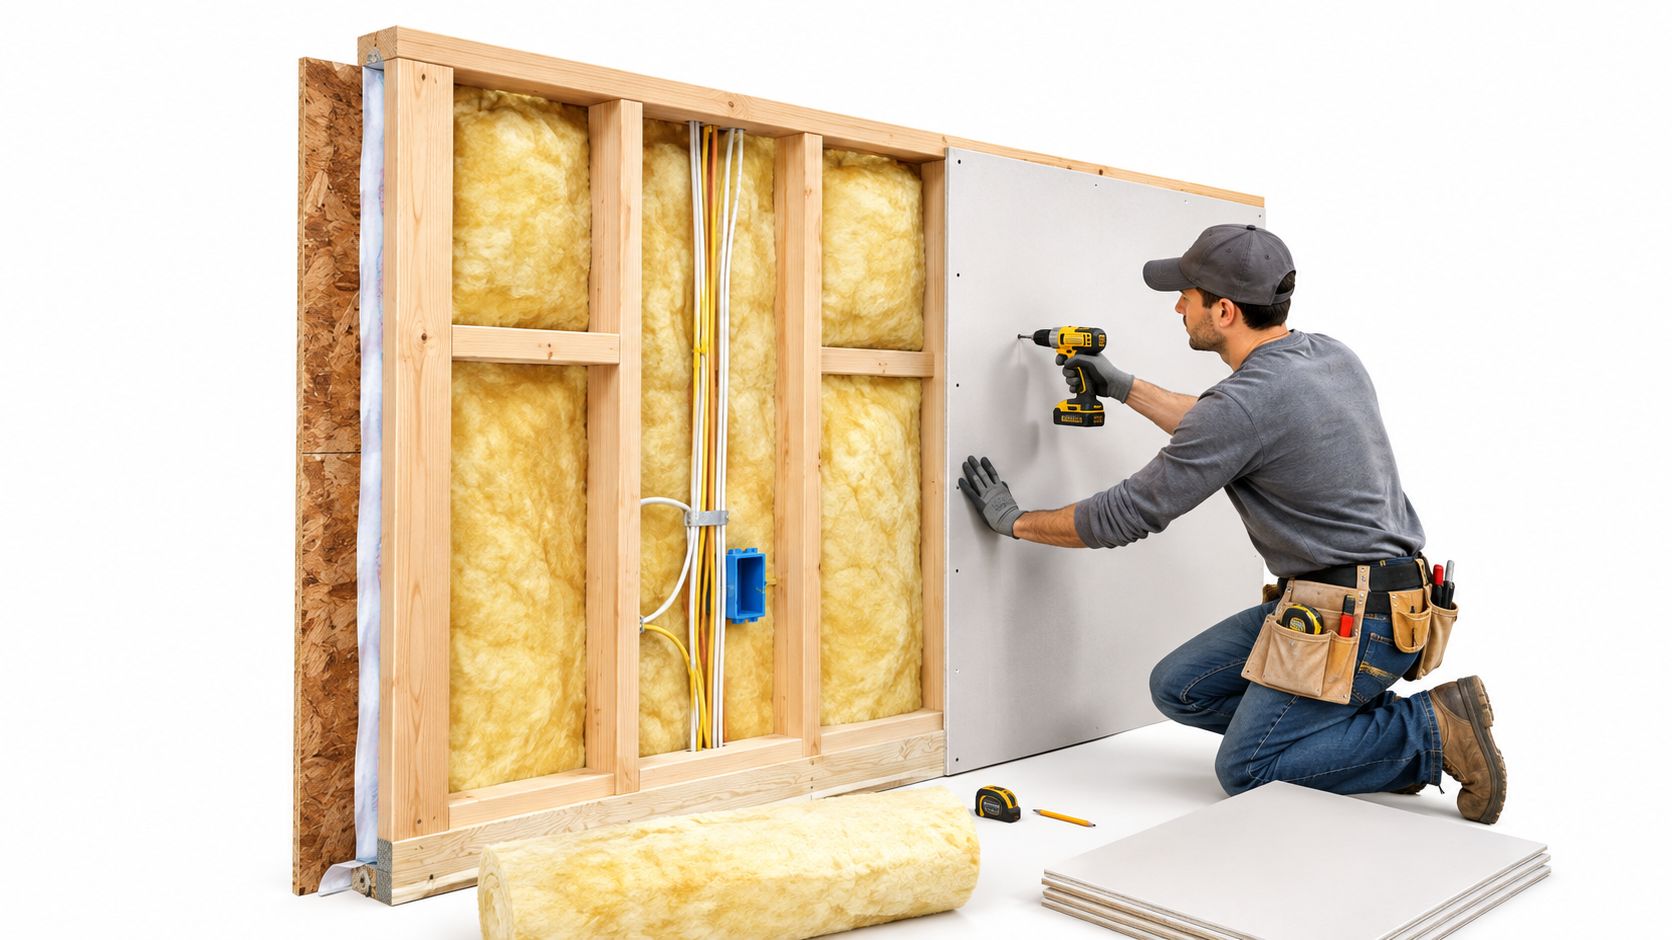
Start with a wall section, not a product brochure. The drawing should show the exterior panel, weather-resistive layer where required, girts, air barrier, insulation, interior stud wall, vapor control strategy, drywall, slab edge, and any required fire or draft stopping. It should also show how the wall meets the roof, windows, doors, corners, and partitions.
A 2x6 interior wall can provide useful depth for insulation and utilities, but it can't automatically solve thermal bridging through posts and girts. The designer must decide where the continuous insulation or air-control layer sits and how it remains continuous around structural interruptions. Spray foam, batt insulation, rigid insulation, and hybrid assemblies each require compatible detailing. The choice should follow the climate, code requirements, moisture strategy, and manufacturer instructions.
Coordinate backing and penetrations
Drywall installers need a predictable fastening surface. Steel panels and widely spaced girts may not provide it, especially at corners, partition intersections, ceiling transitions, cabinets, shower surrounds, and tall wall areas. Add blocking or furring where the finish schedule requires it, and show that work on the framing plan.
Mechanical contractors also need clear routes. Interior partitions may carry wiring, plumbing, and ductwork, while the exterior wall assembly must remain intact. Every penetration through the air or vapor control layer needs a sealing detail. If the crew cuts around posts or pipes without a planned method, the finished wall can contain hidden leakage and moisture risks.
The shell is weather-tight only when its openings, joints, and penetrations are detailed. Metal siding by itself isn't an insulation system.
The interior framing crew should review the shell drawings before setting partitions. Check finished wall thicknesses, window returns, door jamb depths, electrical box locations, plumbing chases, and the relationship between interior walls and primary posts. This meeting often prevents the familiar failure where a partition lands directly on a post, leaving no room for insulation or forcing a late redesign.
Navigating Code Compliance and Structural Pitfalls
A barndominium kit isn't a permit. A manufacturer can provide a useful structural package, but the local authority still needs documentation that fits the site and the intended occupancy. The engineer and builder must verify the building classification, foundation, connections, openings, fire separation, energy provisions, and residential finish requirements.
Pre-engineered metal buildings must be matched to local wind speed, snow load, and seismic requirements. Industry coverage also notes that the 2024 IBC added clearer language defining a metal building system, which makes classification and documentation more important when a steel shell is adapted for residential use (Construction Owners coverage of metal building systems).
Local conditions control the design
A frame package designed for a different county may use different assumptions for wind exposure, ground snow, seismic design, soil bearing, frost conditions, or drainage. The building department may also have local amendments, zoning restrictions, accessory-use rules, or residential design requirements that affect the proposal.
Ask the engineer to identify the governing design criteria in writing. Confirm that the drawings show the actual site, building dimensions, openings, roof geometry, foundation, and intended use. A shop attached to living space can introduce fire, egress, ventilation, and separation issues that a basic agricultural building package doesn't address.
Watch the common failure points
Under-sized or poorly spaced secondary members can create problems before the interior work starts. The panels may fit while the insulation, drywall, cabinets, or utility routes do not. Moisture at the slab edge is another recurring concern. The wall and floor details need to manage drainage, capillary movement, air leakage, and thermal continuity at the point where the shell meets the foundation.
Use a written preconstruction review to catch these issues:
- Secondary framing: Compare girt and purlin spacing with insulation, drywall, liner, and service requirements.
- Openings: Confirm headers, jambs, trim, flashing, and structural reinforcement for every window, entry door, and overhead door.
- Foundation interface: Check post connections, slab edges, drainage, insulation, anchors, and moisture protection.
- Interior separation: Coordinate fire-rated assemblies, shop-to-house separation, egress, and mechanical ventilation where applicable.
- Inspection documents: Make sure the permit set, engineering package, revisions, and product approvals all describe the same building.
A local permit specialist or experienced residential post-frame builder can help coordinate submissions, but the owner should still understand the scope. Permitting and inspection resources for barndominium projects can support early research, while the project engineer remains responsible for the design documents and the builder remains responsible for executing the approved work.
Vetting Builders and Finalizing Your Framing Plan
The builder who can erect an agricultural shell isn't automatically qualified to deliver a residential barndominium. The difference appears in the details: foundation coordination, insulation continuity, window openings, interior backing, mechanical penetrations, inspection timing, and responsibility for revisions.
Ask prospective builders technical questions and require answers in the proposal. A capable residential post-frame team should be able to explain how the shell and interior framing interact, not just show attractive finished photos.
Questions that reveal actual experience
Ask who designs and seals the structural plans, who verifies local loads, and who handles revisions after the building department comments. Then ask how the builder will coordinate:
- Interior partitions: How will non-load-bearing 2x6 walls align with posts, girts, windows, doors, and drywall backing?
- Insulation: Where will the continuous air-control and thermal layers sit, and how will the crew seal transitions?
- Utilities: Which contractor coordinates under-slab plumbing, electrical entries, ducts, and penetrations before the slab and shell close?
- Openings: Who designs reinforcement for large windows, garage doors, porches, and attached shop connections?
- Scope: Does the price include only the shell, or also insulation, interior framing, drywall backing, trim, and weather-sealing details?
- Inspections: Who schedules hold points, supplies documents, and corrects work that fails inspection?
Request a sample wall section and a marked-up framing plan, not just a floor plan. Review how the proposal identifies building dimensions, clear spans, foundation assumptions, structural connections, secondary framing, shell panels, and interior responsibilities.
A strong bid makes the interfaces visible. A weak bid leaves the interfaces for the jobsite to discover.
Check references for projects with comparable residential scope, especially homes that combine living space with a shop or garage. Ask former clients whether the builder coordinated the shell and interior trades effectively, whether change orders arose from missing framing or insulation details, and whether inspections followed the approved plans.
Use questions to ask a barndominium builder as a starting point, then tailor the discussion to your site, climate, floor plan, and permit requirements. Compare proposals on scope and responsibility, not only on the shell price. The lowest number can become the most expensive option when the framing plan omits backing, insulation transitions, engineered connections, or residential inspection work.
Finalize the framing plan only after the engineer, shell builder, interior framer, insulation contractor, mechanical trades, and permitting contact have reviewed the same drawings. That coordination is what turns a wide-span shell into a code-compliant home that performs as intended.
BarndoBuilderList helps buyers research barndominium-friendly builders by state or ZIP code and compare profiles, scope notes, and source links before making calls. Use the directory to build a shortlist, then ask each candidate the framing, insulation, permitting, and shell-versus-turnkey questions raised here by visiting BarndoBuilderList.
- framing a barndominium
- post-frame construction
- barndominium builders
- pole barn framing
- metal building framing