Condensation Prevention in Metal Buildings
Stop drips, musty air, and rust before they start. Practical condensation prevention strategies for barndominiums, with climate-aware tips
You notice it on a cold morning or a sticky summer evening. The roof starts dripping, fasteners grow rust halos, the purlins look wet, and suddenly a “fully insulated” metal building feels less like a house and more like a sweating cooler.
That's the part people get wrong. Condensation prevention in metal buildings isn't one product and it isn't solved by stuffing more insulation into a cavity. Steel changes temperature quickly, carries heat and cold efficiently, and exposes mistakes fast. If warm, humid air can reach a cooled metal surface, it will.
What works is a layered approach that matches the building's climate, assembly, and occupancy. A barndominium in Maine usually fails for a different reason than one in Mississippi. The shell may look similar. The moisture dynamics are not.
Table of Contents
- Why Metal Buildings Sweat in the First Place
- Diagnosing What's Actually Causing Your Condensation
- Choosing the Right Wall and Roof Assembly
- Ventilation and HVAC Strategies That Actually Work
- Retrofit Fixes and Daily Habits That Keep It Dry
- Common Pitfalls That Undo Good Work
- A Practical Checklist for Builders and Buyers
Why Metal Buildings Sweat in the First Place
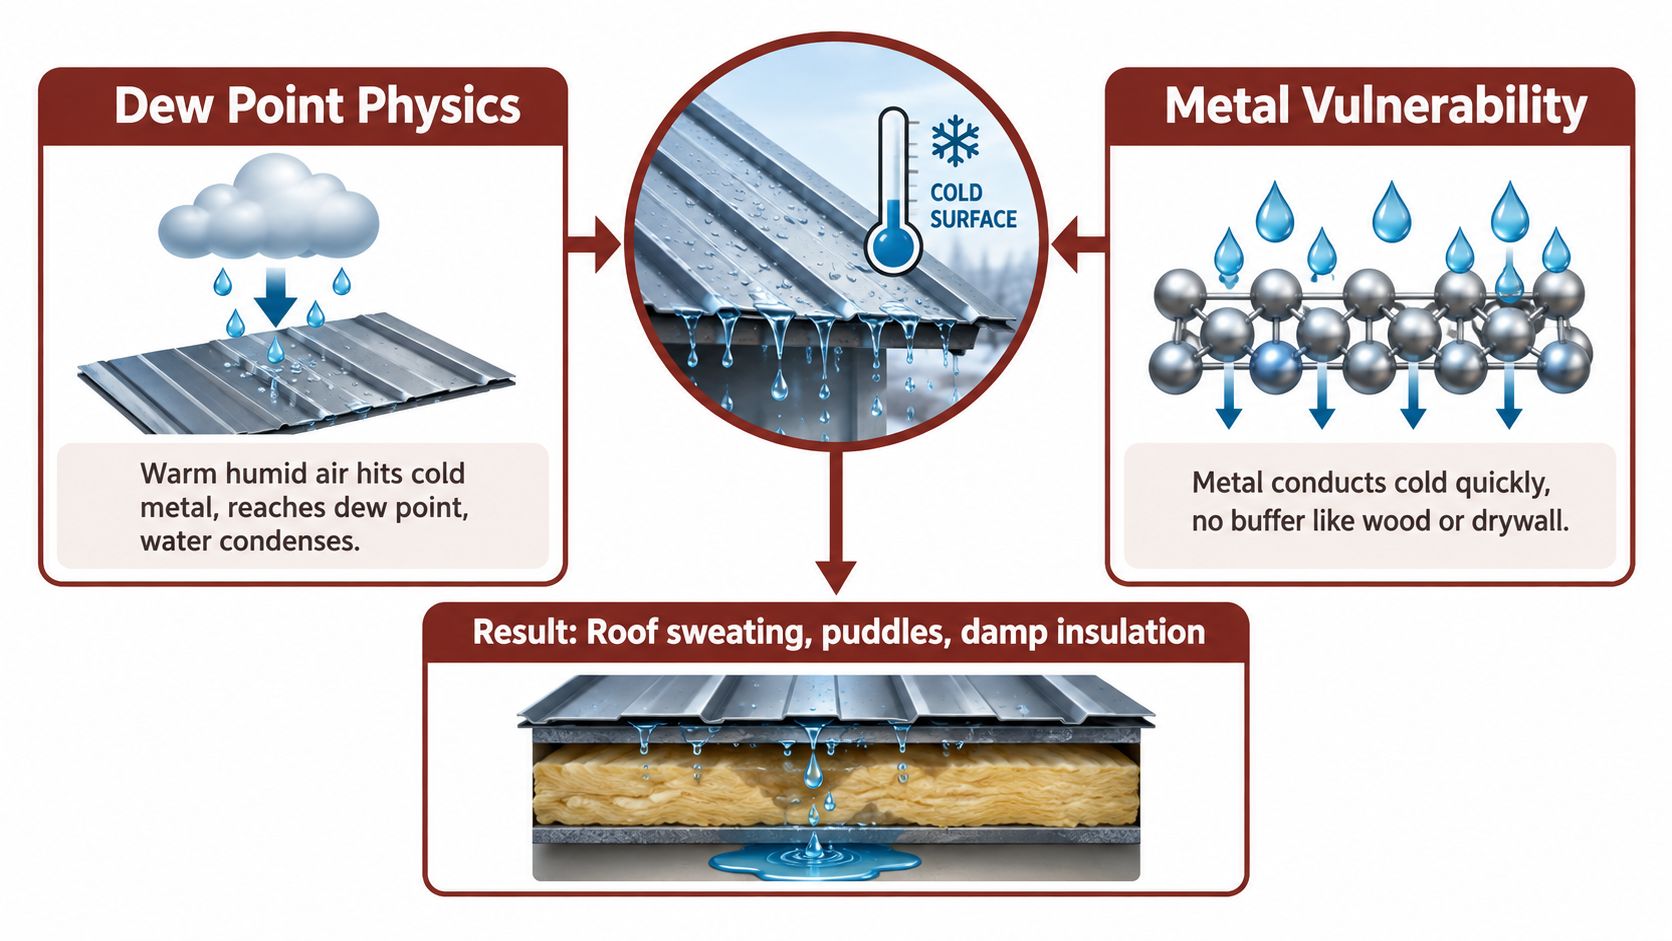
A metal building can be bone dry one day and dripping the next because the shell reacts fast. Steel does not store much heat, so roof and wall panels track outdoor conditions quickly. If indoor air, or outdoor air in the wrong climate, reaches that cooled metal at the right moisture level, water shows up on the surface.
Dew point controls the outcome
Temperature alone does not decide whether a roof sweats. Dew point does.
A shop at a comfortable indoor temperature can still have condensation if the air carries enough moisture from showers, cooking, laundry, people, slab moisture, vehicle snow melt, or an unvented propane heater. If the underside of the roof panel drops below the dew point of that air, the steel becomes the condensing surface.
The U.S. Environmental Protection Agency recommends keeping indoor dew point low in cooling conditions and limiting uncontrolled air leakage because air leaks move moisture into assemblies fast (EPA moisture control guidance). On metal jobs, that air leakage piece gets missed all the time. Owners blame the insulation thickness when the bigger problem is humid air reaching cold steel through seams, penetrations, and framing breaks.
Why metal shells expose mistakes faster
Metal shells are less forgiving than wood-framed assemblies. The panel, the purlin, the fastener, the ridge, and the eave all respond to temperature swings with very little buffering. That creates sharp cold spots at thermal bridges and connection points, which is why sweating often starts in lines or rings instead of across the whole ceiling.
Three things usually decide whether the shell stays dry:
- Surface temperature. If the metal gets cold enough, condensation starts.
- Moisture load. Daily living, slab drying, stored equipment, animals, or process loads can push indoor humidity higher than owners expect.
- Air pathways. Small leaks can carry a surprising amount of moisture to the back side of panels and into roof or wall cavities.
I see this in “insulated” buildings all the time. The insulation is present, but it is compressed at purlins, interrupted at laps, or paired with a weak air seal. On paper the R-value looks decent. In the field, the cold strip at each framing line still reaches dew point.
The shell is a system, not a single product
Condensation control in a metal building is not just an insulation decision. It is the result of how the roof panel, underlayment or liner, thermal breaks, insulation layers, air barrier, vapor control, ventilation, and indoor humidity management work together.
A radiant barrier can help in some assemblies. It will not make up for wet indoor air. Closed-cell spray foam can keep humid air off the steel and raise the panel temperature, but it costs more and changes future repair options. Fiberglass systems are often cheaper up front, but they depend heavily on installation quality and continuity at framing. There is no universal winner. The right assembly depends on climate, use, and how much humidity the building will generate.
Climate changes the failure pattern
The same metal shell behaves differently in Maine than it does in Mississippi.
In cold climates, the usual winter problem is indoor moisture migrating toward cold roof and wall steel. In hot-humid climates, outdoor moisture can drive inward, especially when air conditioning keeps interior surfaces cool for long stretches. Mixed climates get both patterns at different times of year, which is why copied details fail so often.
That is the part owners and even some crews underestimate. A metal building sweats because a fast-changing steel shell, a specific climate, and a specific moisture load were allowed to line up at the same time. Stop any one of those conditions consistently, and the dripping stops.
Diagnosing What's Actually Causing Your Condensation
The expensive mistake is fixing the symptom instead of the cause. A dehumidifier won't solve a bad roof assembly. More venting won't fix an air leak dumping shower humidity into a cold cavity. Before spending money, pin down the failure mode.
What the building is already telling you
Start with the visible clues. Water beading on purlins and panel undersides usually points to surface condensation. Rust streaks under fasteners often suggest repeated wetting at a thermal bridge or leakage path. Eave staining can mean humid air is reaching the roof plane and condensing before draining toward the perimeter. In winter, frost lines usually trace cold framing or air leaks.
Smell helps too. A sharp metallic smell with visible droplets often points to active condensation on steel. A musty odor pushes you to look for repeated wetting inside insulation, cavities, or finishes.
| Symptom | Most Likely Cause | First Diagnostic Step |
|---|---|---|
| Droplets on roof panels | Indoor humidity hitting cold metal | Check indoor humidity and dew point trends |
| Wet purlins at isolated lines | Thermal bridging at framing | Inspect framing lines for missing thermal break |
| Rust below fasteners | Repeated condensation or leakage at penetrations | Examine washer condition, panel laps, and sealant continuity |
| Moisture worst after showers or cooking | High interior moisture load | Verify bath and kitchen exhaust reaches outdoors |
| Frost stripes in winter | Air leakage or cold bridging | Trace ceiling penetrations and top-of-wall transitions |
| Damp insulation near eaves | Vent blockage or poor edge detailing | Inspect baffles, soffit pathways, and eave closure details |
Track timing before you open up walls
Timing narrows the diagnosis fast. Morning drips after a cold night usually mean the steel stayed cold while indoor moisture built overnight. Evening issues in summer can point to humid outdoor air entering a cooled structure. Moisture spikes after showers, laundry, or a full day of cooking usually mean the building lacks enough exhaust or active drying.
Use a simple hygrometer and log indoor conditions in the main living space, bedroom wing, and any loft or bonus room. Compare those readings with what's happening outside. You're not chasing one bad moment. You're looking for patterns.
Separate leakage from bridging from moisture overload
Most problems fall into one of three buckets:
Air leakage paths
Wetting clusters around penetrations, trim transitions, attic hatches, can lights, or top plates.Cold bridging
Moisture outlines purlins, girts, and fastener lines more than open insulated bays.Excess interior moisture generation
The whole building runs humid because of unvented dryers, long showers, stored firewood, combustion appliances, or tightly closed bedrooms with poor air movement.
If condensation shows up only in a few lines or spots, suspect details. If it shows up everywhere, suspect humidity load and system imbalance.
Choosing the Right Wall and Roof Assembly
A metal shell can look tight and dry on move-in day, then start dripping by the first cold snap or the first humid week with the AC running. The reason is simple. Steel changes temperature fast, and once interior moisture finds a cold panel, the assembly gets judged by its weakest layer, not the label on the insulation bag.
Good wall and roof assemblies handle four jobs together: keep humid air off the steel, keep the steel warm enough to avoid frequent dew point hits, allow some drying when small amounts of moisture get in, and stay buildable in the world around purlins, girts, eaves, and trim. Roofs usually need the stricter approach because they see stronger radiant gain by day and faster cooling at night. Walls give you more room to build a forgiving assembly, but they also get punctured more often by wiring, windows, and interior finishes.
The real trade-offs in common assemblies
Closed-cell spray foam against the steel is the assembly I trust most when the shell is already up and the owner wants the shortest path to reliable condensation control. It air-seals and insulates at the surface that matters most. The downside is price, and the job has to be clean. Thin spots at laps, eaves, or around secondary framing are where problems come back.
Closed-cell spray foam plus cavity insulation usually gives better overall performance per dollar than trying to buy all the R-value with foam alone. I like this approach in cold and mixed climates where the foam layer can keep the first condensing surface warm and the cavity insulation can do the cheaper bulk thermal work. The catch is ratio. Too little foam in a cold climate can leave the steel or the foam interface cold enough to collect moisture.
Double-bubble radiant barrier has a narrow lane. In an unconditioned storage building, it can reduce some underside dripping if it is detailed as part of a broader system. In a conditioned barndominium or shop-house, it gets oversold constantly. It does not replace insulation, and it does not forgive air leakage. Owners hear "condensation blanket" and expect a full thermal assembly. That is where disappointment starts.
Mineral wool with a smart vapor retarder makes sense in walls when you have room for a real interior service cavity or a disciplined air-control layer. Mineral wool tolerates incidental moisture well and fills irregular cavities better than some batt products. But it is not self-sealing. If indoor air can bypass the retarder and reach cold steel at transitions or fastener lines, the assembly can still sweat.
Climate should decide the stack-up
The right answer in Maine is not the right answer on the Gulf Coast. Metal buildings magnify that difference because the cladding has very little thermal buffering.
In cold climates, the priority is keeping the steel or the first condensing layer warm enough during long heating seasons. That usually pushes the design toward spray foam at the panel, or enough continuous insulation to control dew point, with interior layers that do not trap moisture. The Building Science moisture control digest is still a solid reference on why vapor retarders should be chosen as part of a drying strategy, not treated like a universal plastic-sheet rule.
In hot-humid climates, outdoor moisture is often the aggressor for much of the year, especially when the building is air conditioned. Assemblies need to limit humid outdoor air entry and avoid trapping moisture between low-perm layers. A roof or wall that looks safe on a winter detail sheet can turn into a summer inward-drive problem if foil, poly, and sealed interior finishes all get stacked together.
Mixed climates need the most restraint. These assemblies have to survive both heating and cooling seasons, which is why hybrid approaches often work well if the air barrier stays continuous and one side can still dry.
Marine climates reward boring, careful assemblies. Moderate temperatures fool people into cutting corners, but frequent damp conditions expose every gap at base trim, corners, and roof edges.
| Climate Zone | Recommended Assembly | Assembly to Avoid |
|---|---|---|
| Cold-dry | Closed-cell foam against steel, with added interior cavity insulation if needed | Interior polyethylene paired with another low-perm layer that traps moisture |
| Mixed | Hybrid assembly with strong air sealing and a clear drying path for the full wall or roof | Imported cold-climate vapor details that ignore summer inward vapor drive |
| Hot-humid | Assembly that limits humid outdoor air entry and avoids trapping moisture between low-perm layers | Foil-heavy or poly-heavy double vapor barrier arrangements |
| Marine | Air-sealed assembly with good thermal continuity and careful edge detailing | Thin reflective products used as the main condensation control strategy |
Assembly details decide whether the design survives the build
Failures usually show up at the transitions, not in the center of the field. Foam stops short above the wall line. Insulation gets pinched behind hat channels. Closures are installed for weather but leave air paths at ribs and trim. Purlins and girts bridge through the assembly and create cold stripes that show up later as dirt lines, damp fasteners, or mold at finish surfaces.
That is why I look at the section cut and the install sequence together. A good roof detail on paper can still fail if the crew cannot reach the eave junction after the shell package is erected. If you are still comparing shell packages, reviewing shell and dry-in builders can help you find companies that already plan for insulation depth, vent paths, and closure detailing instead of leaving condensation control to whoever shows up after the shell is done.
Pick the assembly that matches the climate, the building use, and the budget for execution quality. The best-performing option on paper is a poor choice if the crew cannot install it continuously.
Ventilation and HVAC Strategies That Actually Work
A metal building can have decent insulation and still drip by breakfast. I see it after cold nights when indoor moisture rides up into the roof cavity, hits a chilled panel, and turns the underside of the metal into a condensing surface. Ventilation and HVAC do not fix a bad assembly, but they do control what the assembly has to endure every day.
Passive venting has to be continuous
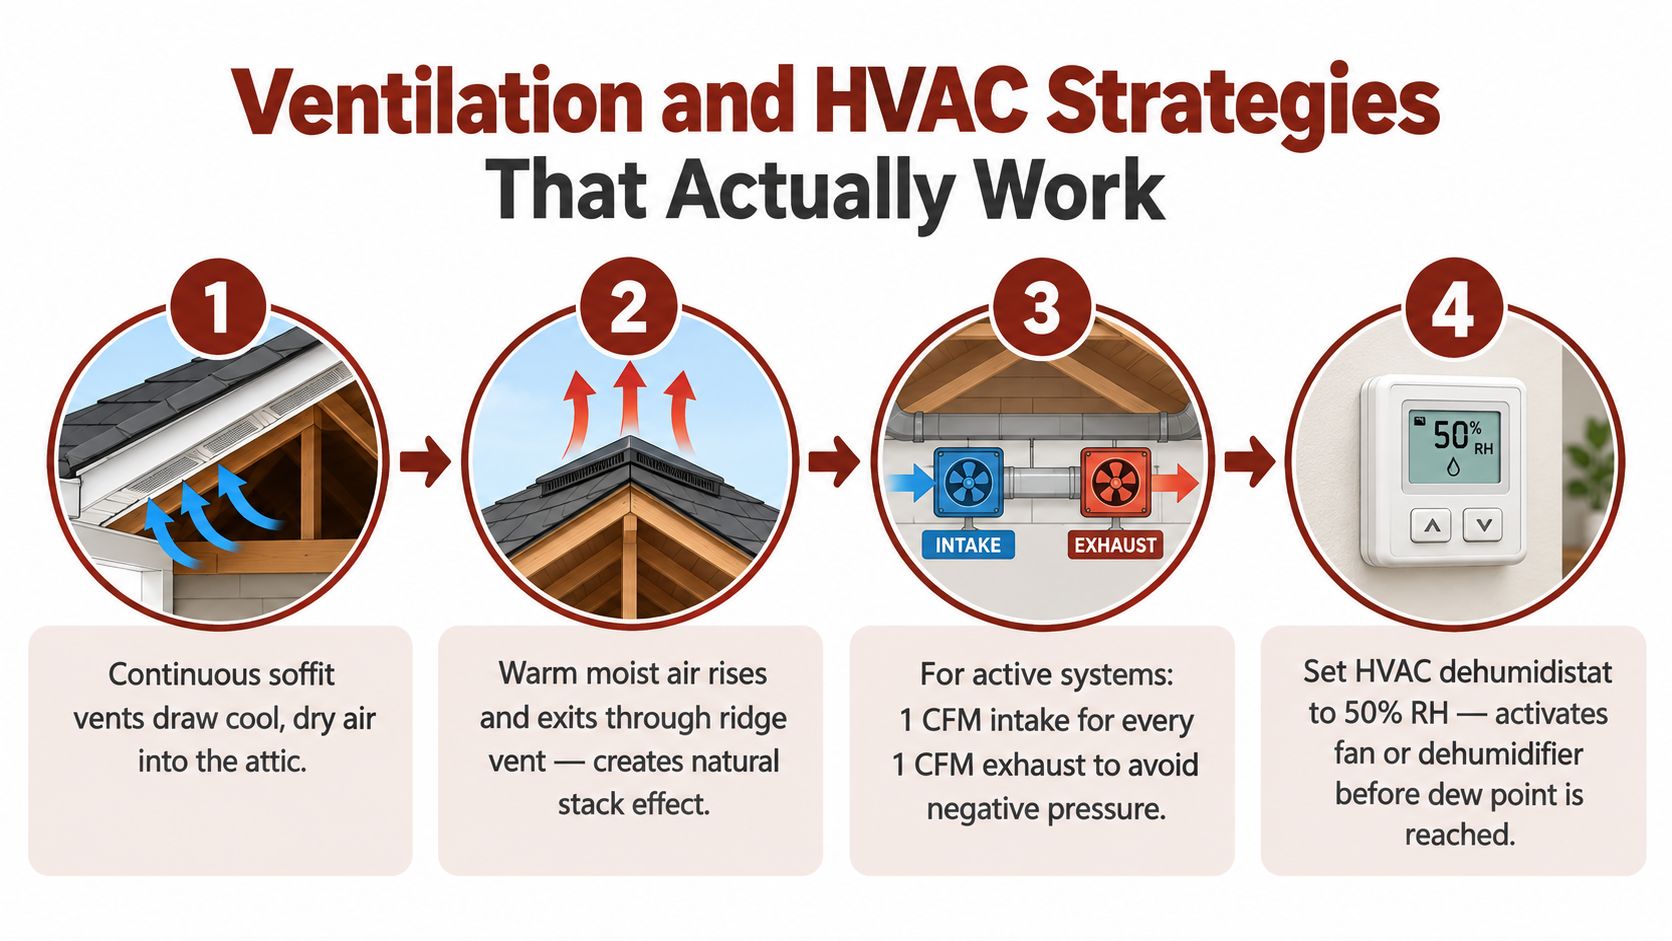
On attic-style metal roofs, the vent path matters more than the vent count. Continuous eave or soffit intake paired with a ridge vent usually outperforms a roof dotted with isolated openings, because air can travel from low to high instead of stalling in pockets.
A lot of roofs get labeled "vented" even though the intake is choked off by insulation, closures, or trim details. Then the ridge vent only acts as a hole at the top of the roof. That setup does very little in calm weather and can create uneven drying.
Climate changes how much passive venting can do for you. In cold regions, venting helps flush moisture that escapes the living space before it condenses in the roof. In hot-humid regions, bringing in outdoor air does not dry anything unless the building is air sealed and the indoor dew point is being controlled. A vent detail that works in Maine can add moisture risk in Mississippi if the rest of the system is sloppy.
Room exhaust needs to leave the building
Local moisture should be captured at the source and discharged outdoors. Bath fans, laundry exhaust, and kitchen hoods all matter more in metal-shell buildings because the shell cools quickly and gives moisture less room for error.
Fans dumped into an attic, soffit, or dead plenum usually create the exact wet zone you were trying to avoid. I have opened up plenty of roof edges where the stain pattern led straight back to a bath fan terminating short of the exterior.
Run bath fans during showers and long enough afterward to bring the humidity back down. Use a vented range hood when cooking with open pots, not just when smoke is visible.
Here's a visual on how the airflow pieces should work together.
Tight envelopes need mechanical balance
Tighter buildings need deliberate fresh-air design. They do not tolerate random pressure swings well, especially when the shell is metal and the roof skin can drop below the indoor dew point fast.
In colder climates, HRVs often make sense because heat recovery matters and winter air is usually dry enough to help. In mixed and humid climates, ERVs are often the better call because they reduce the moisture penalty that comes with ventilation. Neither one is a cure-all. If the duct layout is poor, interior doors stay shut, or the house is running negative pressure from exhaust-only equipment, you can still drive moisture into the wrong places.
Return paths matter here. Closed bedrooms with supply air and no easy path back to the central return often end up stuffy, pressurized, and more humid than the rest of the house.
A metal shell can be airtight and still stay damp. Airtightness helps only when ventilation, filtration, and humidity control are working together.
Humidity targets matter, but dew point matters more
Indoor relative humidity in the usual comfort range is a reasonable starting point, but I pay closer attention to dew point and surface temperature. That is the part owners miss. The same indoor humidity that causes no trouble on a mild day can create sweating on metal trim, fasteners, or roof panels after a sharp temperature drop.
For air-conditioned buildings in humid climates, steady dehumidification usually pays off better than trying to overcool the space. For cold climates in winter, the trade-off is different. Indoor humidity often has to come down as outdoor temperatures fall, or window frames, roof edges, and other cold spots start showing it first.
If you are sorting out who handles ducting, bath fan routing, drywall timing, and trim details around the conditioned space, these interior finish-out contractors can help you identify who coordinates those scopes instead of leaving them fragmented.
Retrofit Fixes and Daily Habits That Keep It Dry
Retrofit work is where priorities matter. If the building already sweats, start with the layers that stop moist air from reaching cold metal. After that, reduce the moisture load the building has to carry every day.
Upgrades that usually pay off
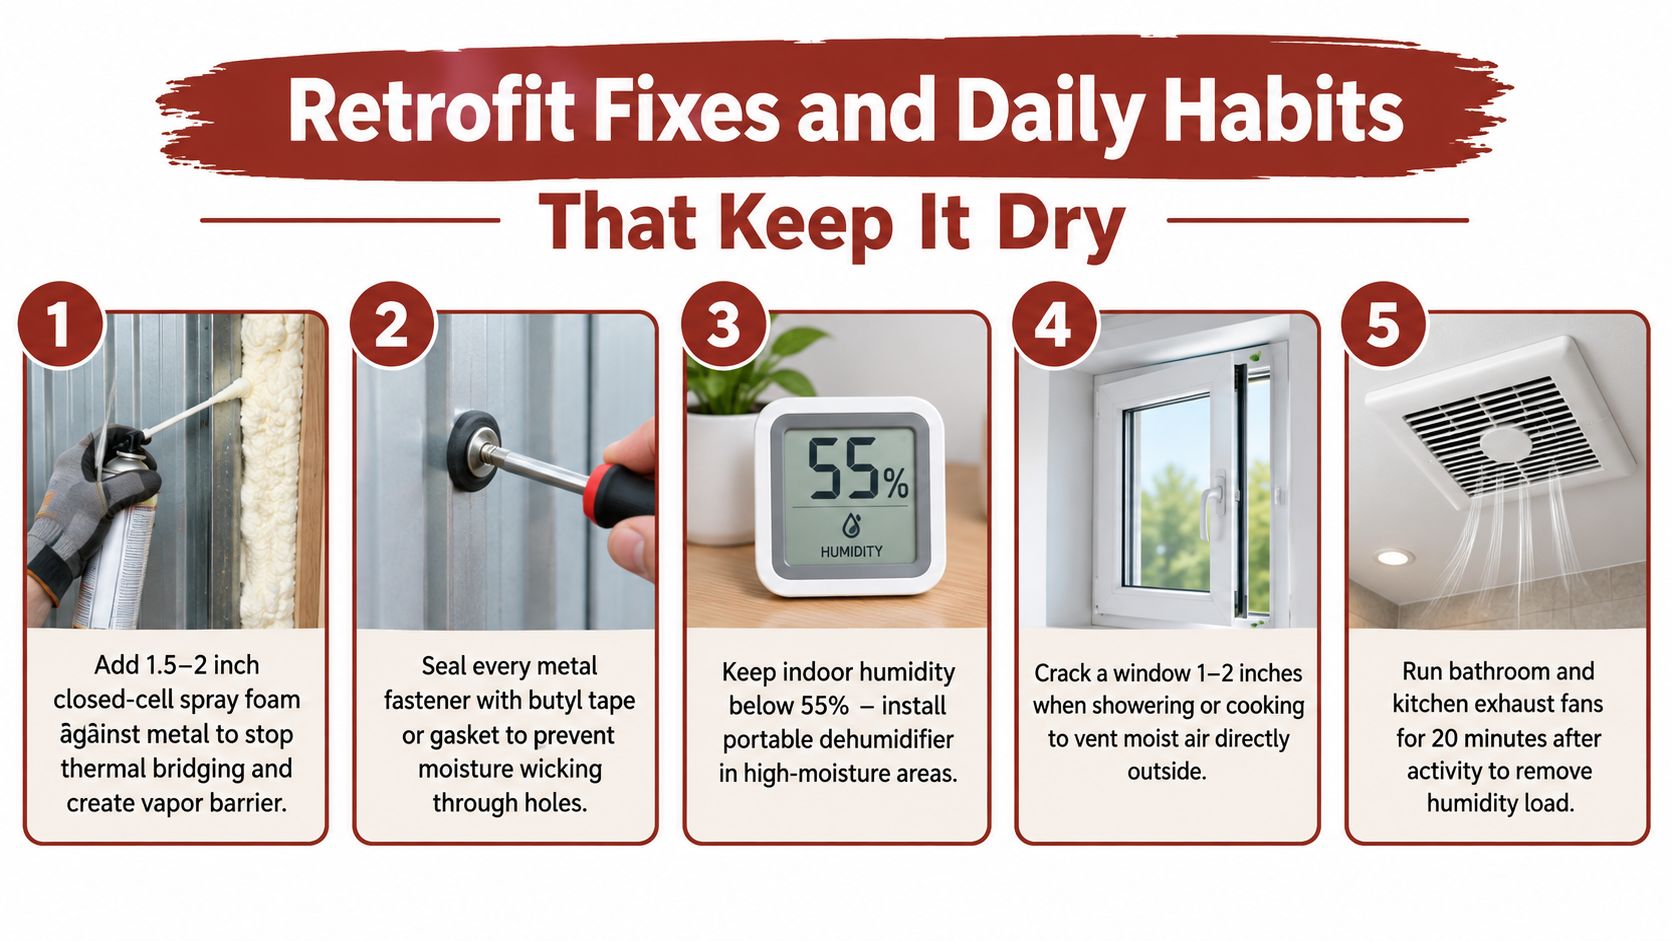
A continuous interior layer of closed-cell spray foam against the metal can be a strong retrofit move because it addresses both surface temperature and air access. Where budget is tighter, sealing seams, laps, and fastener pathways before adding an interior-side smart vapor retarder can still move the building in the right direction.
Thermal continuity matters just as much as nominal insulation level. Guidance tied to moisture-risk assessment notes that avoiding cold bridges is important, and references external-fabric U-values at or below 1.2 W/m²K to reduce internal-surface condensation risk. It also notes that adding about 2 m²K/W of thermal resistance to framing reduced the 90th-percentile condensation-rate CDF to below 0.1 kg/m²/week, described there as roughly equivalent to about 6 cm of extruded polystyrene insulation (BS 5250 summary and related guidance).
Small habits change the load
A lot of moisture trouble comes from ordinary living, especially in tightly finished metal shells.
- Cook with lids on pots: Boiling water indoors adds moisture fast.
- Run the bath fan longer: Don't shut it off when you step out if the mirror is still fogged.
- Vent the dryer outdoors: A dryer should not humidify the house.
- Keep firewood outside the living space: Stored wood carries moisture and dirt.
- Watch plants and aquariums: They can raise indoor humidity more than people expect.
A cheap hygrometer in the main living area gives immediate feedback. When owners can see humidity rise after showers, pasta night, or rainy weather, they make better decisions without guessing.
Common Pitfalls That Undo Good Work
A metal building can look finished, insulated, and tight on paper, then start dripping at the fasteners on the first cold morning. I see that pattern after well-intended upgrades where each piece made sense by itself, but the full assembly had no drying path, no real air control, or no plan for seasonal humidity.
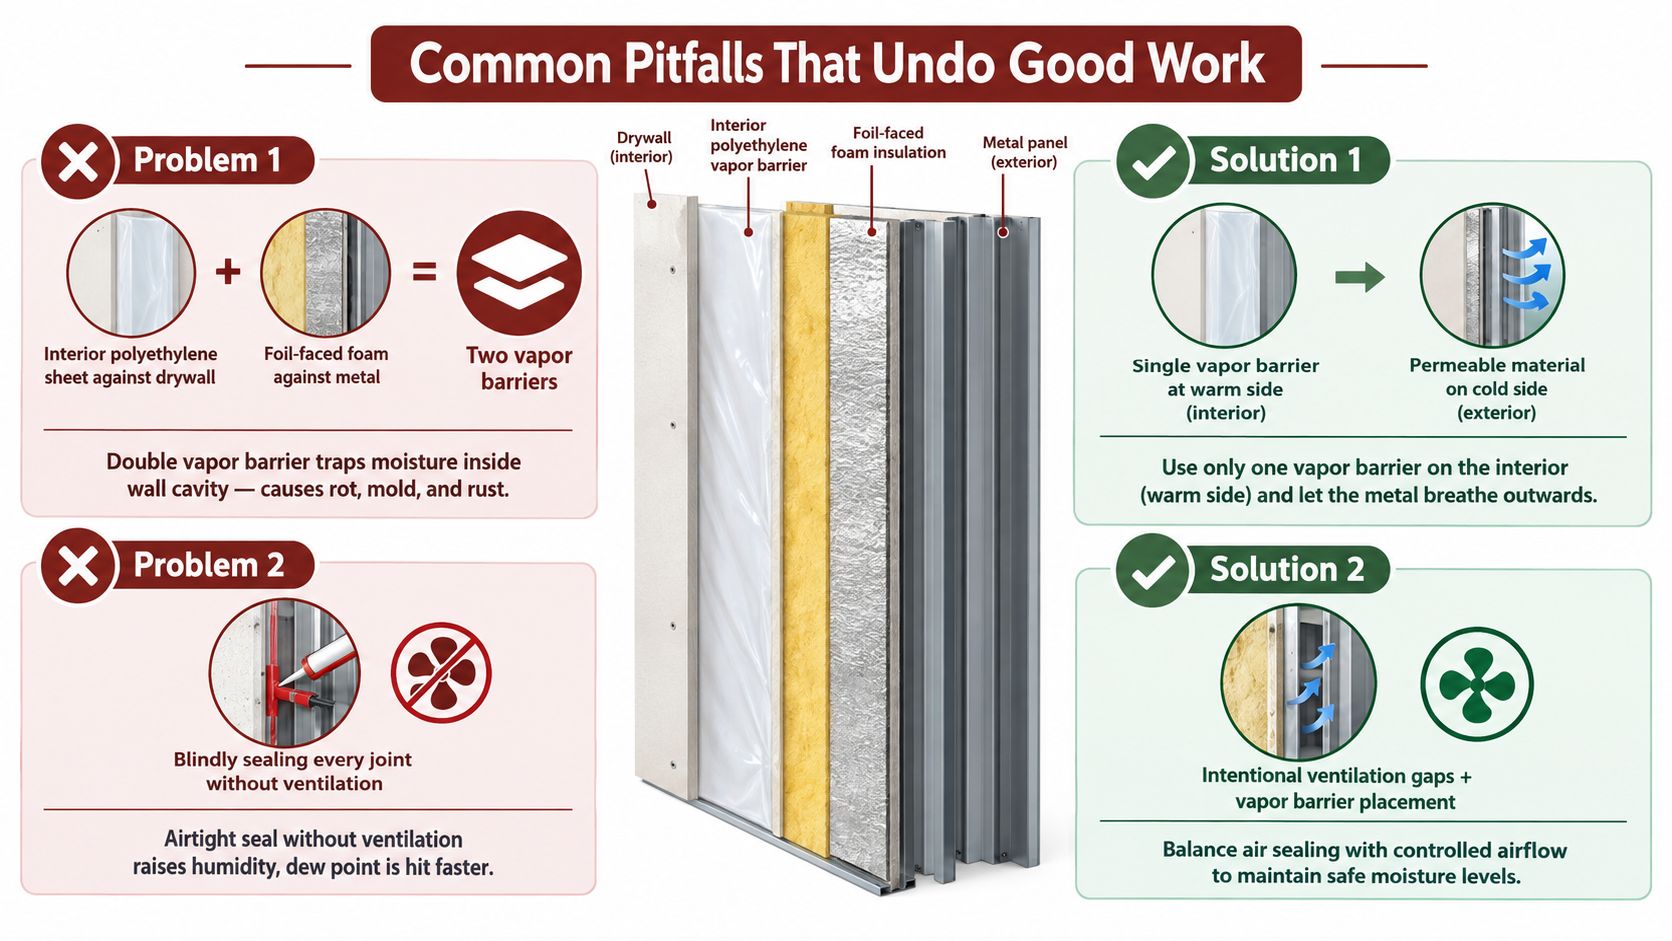
The double vapor barrier trap
This is one of the most common self-inflicted failures in metal shells. A low-perm layer gets installed near the roof or wall steel, then polyethylene is added on the room side out of habit. The cavity ends up trapped between two slow-drying layers.
That mistake does not fail the same way in every climate. In a cold heating climate, interior moisture can get driven toward cold steel. In a hot humid climate with air conditioning, the seasonal vapor drive can reverse and make interior polyethylene a bad fit. The old one-size-fits-all vapor barrier rule caused a lot of trouble for that reason.
The perm discussion is better handled by material class and drying direction than by habit. The U.S. Forest Service handbook classifies vapor barriers at 1.0 perm or less, with higher-perm materials allowing more drying potential (Wood Handbook, moisture and vapor control discussion). In practice, the right question is simple: if this assembly gets wet, where does it dry?
Air leaks usually start at boring details
Condensation failures often begin at parts nobody photographs. Top-of-wall transitions, panel laps, ridge closures, can lights, attic hatches, duct boots, and plumbing penetrations all bypass the insulation layer and carry moisture straight to cold metal.
I have found more wet roof cavities from fan ducts ending short of the exterior than from bad insulation products. The fan worked. The installer just dumped the moisture into the wrong space.
Other repeat offenders show up during retrofits:
- Bathroom or dryer exhaust terminating in the attic or roof cavity: The moisture source is now inside the enclosure.
- Blocked soffit or eave intake: Ridge exhaust cannot pull air from a sealed intake path.
- Dehumidifiers sized for square footage, not moisture load: They run all day and still leave the shell damp.
- Dehumidifiers shoved into a closet corner or behind stored items: Airflow drops and water removal drops with it.
- Combustion appliances without pressure and makeup-air planning: Backdrafting, negative pressure, and moisture problems tend to arrive together.
Good insulation does not rescue a leaky assembly.
Single-component fixes rarely hold up
Owners often spend money on the part they can see first. More insulation. A bigger exhaust fan. New liner panels. Those upgrades can help, but metal buildings sweat because temperature, air leakage, and indoor moisture are interacting at the same time.
Moisture researchers writing for the NCBI note that envelope trouble is frequently tied to moisture, and code guidance they summarize starts with limiting indoor moisture generation, then controlling conditions through heating, ventilation, and insulation (NIH moisture and envelope review). That lines up with field work. Incomplete retrofits fail because the cold surface is still there, the humid air is still reaching it, or the building still cannot shed moisture during the season that matters most.
A roof-first fix may work in Montana and disappoint in coastal Alabama. A polyethylene retrofit that survives one winter in Minnesota can become a summer moisture trap in Mississippi. Metal shells react fast to outdoor swings, so climate-specific assembly choices matter more here than they do in slower, heavier buildings.
A Practical Checklist for Builders and Buyers
The cleanest way to think about condensation prevention is this: every claim should be inspectable. If a contractor says the building will stay dry, you should be able to point to the thermal layer, the air layer, the vapor-control approach, and the ventilation strategy.
Builder-side verification
Before work starts, confirm these items in writing and in drawings if possible:
- Thermal continuity: Ask where the thermal break occurs at purlins, girts, eaves, and base conditions.
- Air sealing plan: Look for sealed penetrations, service openings, top-of-wall transitions, and trim interfaces.
- Vapor-control placement: The retarder should fit the climate and the rest of the assembly, not be added by habit.
- Ventilation path: Intake and exhaust should be balanced and physically unobstructed.
- HVAC moisture strategy: Equipment should address latent load, not only sensible temperature.
Buyer-side field checks
In an existing building or near-complete project, inspect what owners live with:
| Checkpoint | What to Look For | Why It Matters |
|---|---|---|
| Fasteners and panel laps | Rust halos, staining, dampness | Repeated wetting leaves visible clues |
| Skylights and roof transitions | Streaking or discoloration | Condensation often concentrates at detail changes |
| Attic or roof cavity | Blocked intake, wet insulation, frost traces | Tells you whether venting is real or theoretical |
| Bath and kitchen fans | Exterior termination and airflow | Local moisture must leave the building |
| Interior humidity tracking | Hygrometer logs or current readings | Confirms whether the building runs wet day to day |
Three questions worth asking every contractor
When owners ask better questions, the whole conversation improves. Start with these:
- Where is the thermal break?
- Where is the vapor control?
- How is building pressure balanced?
If the answers are vague, the moisture plan is probably vague too. If you want a structured way to vet that discussion, questions to ask a barndominium builder is a useful checklist format for early conversations.
A final note from the field. The best condensation prevention jobs aren't the ones with the fanciest materials. They're the ones where the shell, the mechanical system, and the daily use of the building all agree with each other.
If you're comparing barndominium builders and trying to separate good condensation details from sales talk, BarndoBuilderList gives you a research-based place to start. You can sort builders by state or ZIP, review scope tags like shell or interior finish-out, and build a shorter call list before you commit to an assembly that's hard to fix later.
- condensation prevention
- barndominium insulation
- metal building moisture
- vapor barrier
- dehumidifier