Barndominium Shell Construction Step by Step Shell Guide
Learn barndominium shell construction from slab to envelope. Costs, sequence, insulation and what a shell includes vs turnkey.
You're probably looking at a shell quote that seems manageable, then a finished-home budget that suddenly doesn't. That's where a lot of barndominium projects go sideways. The shell number looks clean because it's only one slice of the job.
In practice, barndominium shell construction is less about “putting up the building” and more about defining exactly what you're buying, when the building becomes weather-tight, and what big-ticket work still sits behind that first quote. Owners usually get stuck in the same places. The slab wasn't ready when steel arrived. Anchor bolts were off. The shell got closed before anyone had a real insulation and vapor plan. Or the quote said “shell” when it really meant something in between shell and dried-in.
A shell can be a smart way to control costs. It can also be the fastest way to underestimate them if the scope is vague. The good projects start with a strict definition, then treat the shell, foundation, envelope, and finish-out as one connected cost stack.
Table of Contents
- What a Barndominium Shell Really Means for Your Build
- What Is Included and What Is Not in a Shell Package
- Planning Your Foundation and Site Before Steel Arrives
- Erecting the Frame Roof and Exterior Envelope
- Insulation Vapor Control and Envelope Performance That Prevents Failure
- Final Checks Budget Planning and Moving Toward Finish Out
What a Barndominium Shell Really Means for Your Build
A shell decision usually gets made at a kitchen table with one number in front of the owner. The quote looks workable. Then budget shows up later, after slab work, insulation, mechanicals, interior framing, and finish materials get priced, and the project feels like it doubled. I see that mistake all the time.
A barndominium shell is not just a stage of construction. It is a cost-stack decision.
The shell is the structural exterior package. In plain terms, that usually means the primary frame, roof system, wall panels, trim, and the hardware needed for erection. Some builders also include doors, windows, or labor. Some do not. That variation is where owners get burned, because two quotes can both say "shell" and refer to very different scopes.
Shell, dried-in, and turnkey mean different budget commitments
On one job, a shell might mean steel delivered to the site. On another, it means the frame is erected and skinned. On a third, it means the building is enclosed with installed openings and ready for follow-on trades. Those are three different price levels, three different handoff points, and three different risk profiles for the owner.
Recent market guides place shell-only steel packages around $20 to $35 per square foot, erected shells around $35 to $55 per square foot, and enclosed shells around $40 to $65 per square foot. For a 2,000-square-foot build, that puts the shell package at roughly $40,000 to $70,000 and an enclosed shell at about $80,000 to $130,000. The same source notes the shell and structure often make up only 25% to 30% of total project cost, with the remaining 70% to 75% tied up in interior systems and finish work like insulation, drywall, plumbing, HVAC, and fixtures, according to 2026 metal building cost data.
That is why a low shell quote can be accurate and still leave the owner badly underbudgeted.
Practical rule: If a shell number feels easy to afford, check what has been pushed outside the contract before you trust it.
The biggest hidden cost is not always labor. It is envelope quality. A cheap shell with weak door packages, poorly planned window openings, thin roof assemblies, or no clear insulation strategy can cost less on day one and more every year after that. Utility bills go up. Condensation problems show up. Interior finish work gets harder because the building was never set up to control heat, air, and moisture properly.
That is the part owners miss when they treat the shell as just steel and screws.
I look at shell decisions through three filters:
- Budget reality: The shell number has to be tied to a full-project budget, not treated as the house cost.
- Scope clarity: Every quote needs a written list of what is furnished, what is installed, and what remains the owner's problem.
- Envelope performance: The roof, walls, openings, and insulation plan need to work together before the shell goes up, not after.
Residential steel shells are not a new idea. A historical review of early metal-frame housing traces U.S. examples back to the Modern Movement period in Los Angeles, and that same source cites a 2024 industry survey showing strong residential participation among metal-building firms. See the metal-frame housing history and industry context.%20Metal-Frame%20Houses%20of%20the%20Modern%20Movement%20in%20Los%20Angeles-%20Part%201-%20Developing%20a%20Regional%20Tradition.%20Architectural%20History,%2032,%20152%E2%80%93172..pdf).
The takeaway is simple. A shell is a defined purchase inside a much larger build. If that definition is loose, the budget will be loose too.
What Is Included and What Is Not in a Shell Package
The fastest way to compare bids is to stop asking, “What's your price per square foot?” and start asking, “What exactly lands on my site, what gets installed, and what remains mine to solve?”
Most shell packages include the visible structure and skin. Most don't include the work that turns the shell into a home.
Typical shell inclusions and exclusions
Multiple cost guides describe a shell or kit as usually including the structural frame, roof and wall panels, trim, fasteners, and sometimes stamped drawings, while commonly excluding the foundation, plumbing, wiring, HVAC, insulation, drywall, and interior finishes. The same 2026 guide places finished barndominiums at about $65 to $160 per square foot, with premium turnkey builds at $225 to $350 per square foot, which is why the low shell number can distort the budget if you don't map the exclusions early. That breakdown appears in this 2026 barndominium kit and finished-cost guide.
Here's the comparison owners need in front of them when they read quotes.
| Scope Item | Shell Included | Turnkey Included |
|---|---|---|
| Structural frame | Yes | Yes |
| Roof panels | Yes | Yes |
| Wall panels | Yes | Yes |
| Trim and fasteners | Usually | Yes |
| Stamped drawings | Sometimes | Usually |
| Slab and foundation | No | Usually |
| Plumbing rough-in and fixtures | No | Yes |
| Electrical rough-in and finish | No | Yes |
| HVAC | No | Yes |
| Insulation | No | Yes |
| Drywall and interior wall finish | No | Yes |
| Cabinets, flooring, fixtures, trim | No | Yes |
The questions that expose vague quotes
A short shell quote isn't the problem. A vague shell quote is.
Use questions like these when a builder says “shell package”:
- Who handles concrete: Is the slab included, excluded, or owner-supplied?
- What counts as enclosed: Are windows, doors, flashing, and closures part of the price?
- What is engineered: Are stamped plans included, and are they for your site conditions?
- What is left for later: Which trades begin only after the shell crew leaves?
- What inspections apply: Who is responsible for corrections if something fails before finish-out?
If you want a tighter bid review process, use a structured list of questions to ask a barndominium builder and make every bidder answer the same scope questions in writing.
A low shell bid can still be a good bid. It just isn't a useful number until exclusions are spelled out line by line.
What works when owners compare bids
The owners who keep control of cost do one simple thing. They force every quote into the same format.
Ask each builder to separate:
- Materials supplied
- Erection labor
- Foundation responsibility
- Weather-tight items
- Mechanical and interior exclusions
That clears up most misunderstandings before anybody orders steel. It also reveals whether one builder is pricing a bare shell and another is pricing something closer to dried-in.
Planning Your Foundation and Site Before Steel Arrives
A lot of shell jobs go sideways before the steel truck ever leaves the yard.
The owner sees a shell price and assumes the hard part starts when columns go up. In practice, the cost stack starts under the building. Dirt work, drainage, concrete, anchor-bolt layout, equipment access, and utility stub-ups decide whether the shell goes up cleanly or turns into paid delay, field fixes, and long-term moisture trouble.
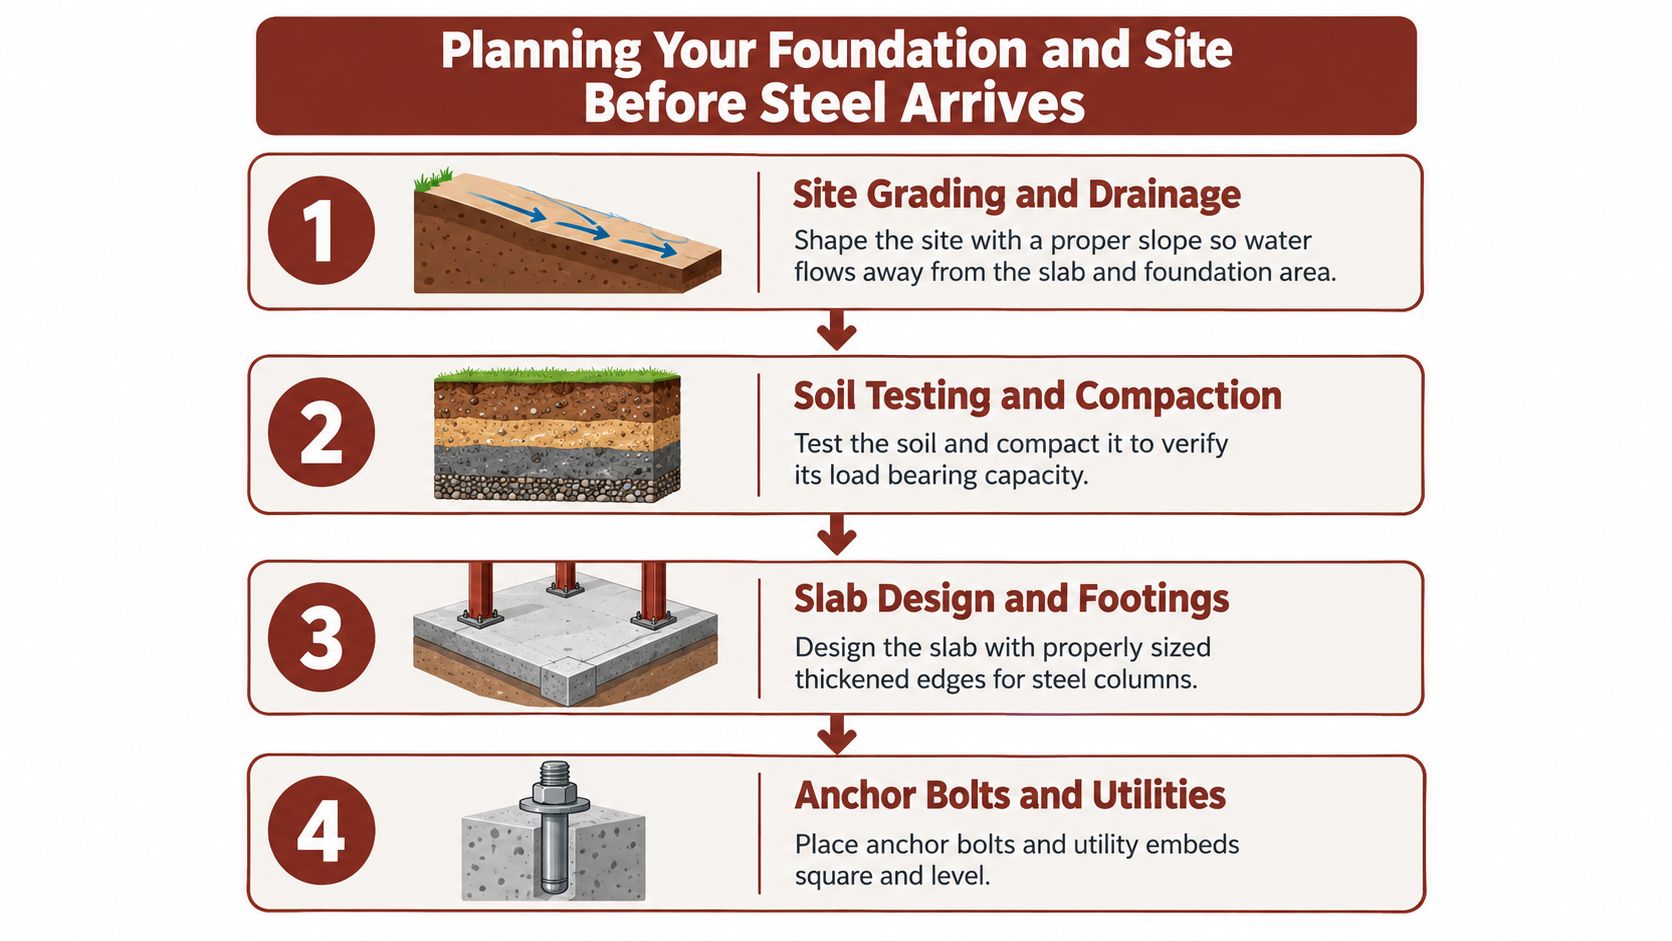
Steel is precise. The slab needs to be just as precise.
Before delivery day, the site should be graded, drained, formed, poured, cured, and checked against the engineered layout. If the pad is holding water, if slab dimensions drifted from plan, or if bolt placement was guessed in the field, the shell crew inherits a problem they did not create. Owners usually pay for that twice. Once in rework. Again later when the building never fits and seals quite right.
The site and slab decisions that control shell cost
Start with drainage. A straight, well-installed shell still performs poorly if surface water sits at the perimeter or runs back toward the slab. That problem shows up later as wet edges, muddy access, splash-back on wall panels, and a building that feels damp even after the shell is enclosed.
Then focus on layout and concrete timing. A typical shell sequence puts the slab and anchor-bolt layout ahead of steel erection, followed by framing, secondary framing, roof and wall panels, and trim and openings, as outlined in this barndominium shell build sequence guide. The sequence matters, but the bigger issue is what owners hide from themselves in the budget. A cheap shell number can unravel fast if the slab crew misses square, leaves low spots, or places penetrations where later trades have to cut around them.
Cure time and anchor bolts are where avoidable delays start
I have seen owners save a week on paper and lose far more than that in the field.
Concrete needs time to gain strength before you start loading anchor points and bringing in erection equipment. Rushing that step puts the shell crew in a bad spot. They either wait, or they work on a slab that is not ready and take on risk that should have been handled in scheduling.
Anchor bolts need the engineer's template. Close is not good enough. If bolt locations are off, crews start slotting, forcing, shimming, or calling for changes. None of that makes the building better. It just burns labor and introduces fit issues that show up again when panels, trim, and doors are installed.
If you are still lining up slab work, a directory of concrete foundation specialists for barndominium projects can help you sort who handles that scope.
A shell sits on the cheapest mistake in the project. The foundation. If the slab is wrong, every trade after concrete pays for it.
What to verify before the steel truck shows up
These checks catch the problems that turn a shell package into a change-order package:
- Drainage falls away from the slab so runoff does not collect at the perimeter.
- Finished slab dimensions match the engineered plans including square, diagonals, and slab elevation.
- Anchor bolts match the template in location, projection, and spacing.
- Utility penetrations are confirmed before the pour so later crews are not cutting finished concrete.
- Access and staging areas are planned so steel, lifts, and delivery trucks do not chew up the pad or get stuck after rain.
A good foundation does more than support steel. It protects the shell budget and sets up the envelope to perform the way owners expect once the building is closed in.
Erecting the Frame Roof and Exterior Envelope
Once the slab is right, erection becomes a sequencing and quality-control job. The shell starts looking fast from the outside, but the best crews still move in a deliberate order.
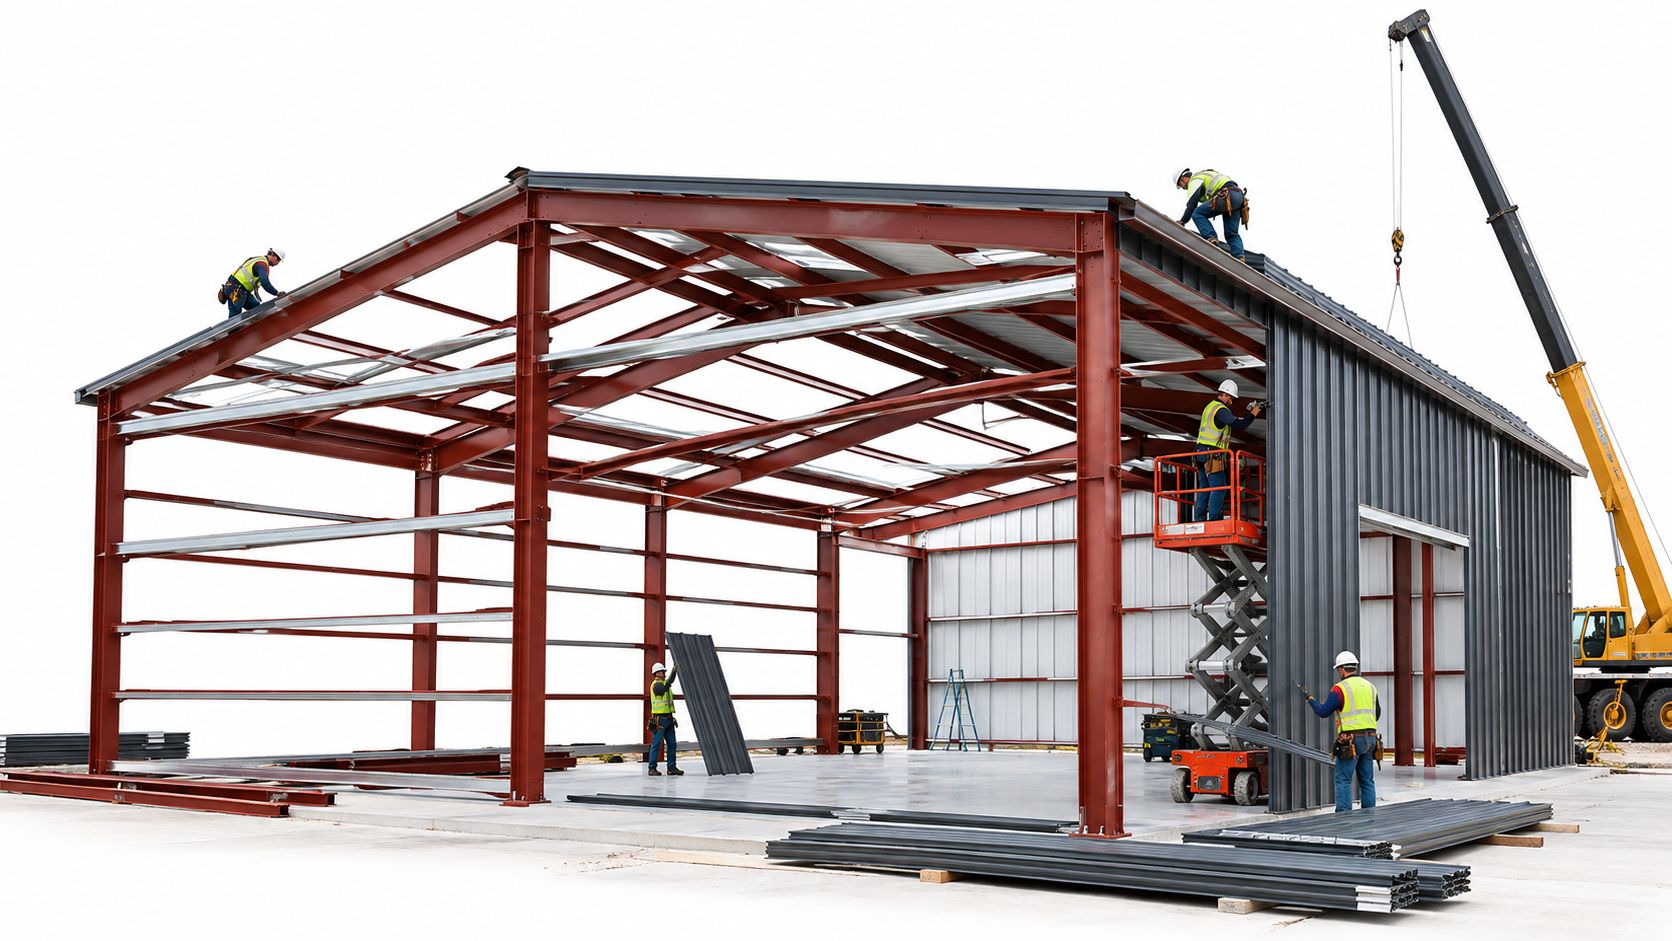
The usual sequence is primary frame first, secondary framing next, then roof and wall panels, followed by trim, flashing, openings, and final inspection items.
Start with the frame and keep checking square
The frame sets the truth for everything after it. If the columns and rafters go up out of plumb, the roof line will show it, the wall panels will show it, and the trim crew will spend the rest of the job trying to hide it.
The practical workflow is simple:
- Stand the primary steel correctly and brace it before moving too far ahead.
- Check plumb and square repeatedly instead of waiting until the frame is fully set.
- Install purlins and girts carefully because this secondary framing controls panel line, straightness, and fit.
- Hang roof panels before wall panels in the planned sequence so runoff and overlap details work as intended.
The reason experienced crews slow down on purlins and girts is straightforward. That stage does more than fill in the frame. It determines how cleanly the building skins out.
Weather-tightness comes from details, not just metal
A lot of owners think the shell becomes reliable the moment the panels are on. Not quite. The shell becomes reliable when the details are right.
That means paying attention to:
- Panel alignment
- Fastener placement
- Trim fit
- Flashing continuity
- Door and window openings
- Closure and seal details at transitions
This is also where crew coordination matters. The erection team needs a consistent plan for who is checking lines, who is tightening, who is aligning panels, and who is watching penetrations and trim conditions before they get covered.
A good visual walkthrough of the process helps if you haven't watched a shell go up before:
The places to stop and inspect
The best shell crews don't wait until the end to inspect. They pause at the spots where mistakes multiply.
If panels are fighting you, stop and find the alignment problem. Don't force the skin to cover a framing error.
Here are the pauses that save rework:
| Checkpoint | What to verify |
|---|---|
| After primary frame set | Plumb, square, brace condition |
| After purlins and girts | Straight runs, spacing, alignment |
| After roof panel install begins | Panel line, overlap, fastener pattern |
| Before wall package is fully closed | Opening locations, flashing prep, closure details |
| Before crew demobilizes | Bolt torque, trim, doors, windows, seal continuity |
What works is boring. Careful layout. Repeated measurements. Crews that tighten the building in sequence instead of racing to visible progress.
What doesn't work is trying to “pull it together later” with trim. Trim can hide very little. It mainly advertises whether the shell was erected cleanly in the first place.
Insulation Vapor Control and Envelope Performance That Prevents Failure
A dried-in shell can still be a miserable building if the envelope is handled poorly. Many barndominium projects lose long-term comfort. The structure is standing, but the interior environment hasn't been thought through.
Metal skin changes the moisture conversation. Warm indoor air meets a cooler metal surface, and condensation shows up fast if the assembly is wrong. Owners often discover this after the shell is closed, when fixing it gets expensive and disruptive.
Why metal shells get into trouble
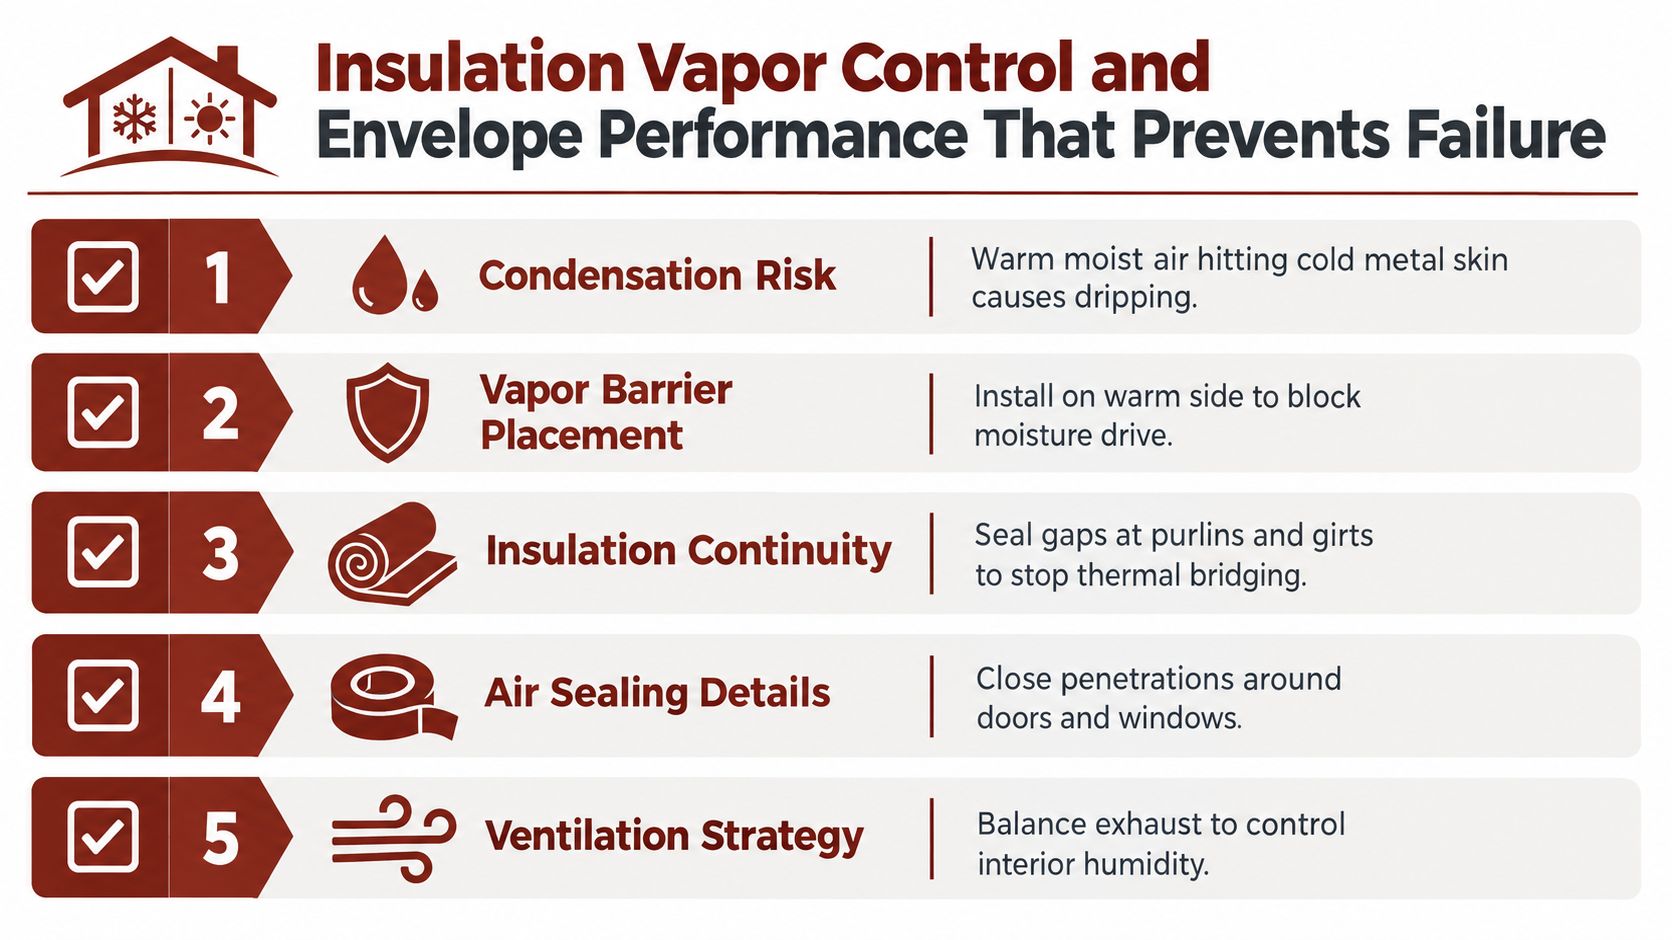
Moisture control is one of the major technical failure points in barndominium shells. Post-frame guidance recommends placing the vapor barrier on the warm side of the insulation. Another technical source specifies 6 mil to 10 mil reinforced poly barriers on walls and notes that some uses or fire codes call for a fire-retardant vapor barrier. A post-frame insulation guide also describes using about 6 inches of insulation between wall supports plus a moisture barrier, as summarized in this barndominium moisture-control and insulation guide.
If that sequence gets ignored, moisture gets trapped behind finishes. Then you're dealing with dripping metal, corrosion risk, and insulation that no longer performs the way you paid for.
What works in the field
The priority is to control vapor drive before interior finishes go in. Once drywall and trim close things up, diagnosing hidden moisture gets harder.
These are the decisions that usually matter most:
- Barrier placement: Put the vapor barrier on the warm side of the insulation in the intended assembly.
- Continuity: Seal gaps around framing transitions, doors, windows, and penetrations.
- Insulation coverage: Avoid leaving weak spots where thermal bridging becomes the default path.
- Ventilation: Give interior moisture a controlled path out instead of letting it collect in the shell.
Inside rain is not a mystery. It's what happens when warm interior moisture reaches cold metal and the assembly wasn't detailed to stop it.
Envelope quality belongs in the budget early
This is also where the cost-stack view matters again. Better envelope performance isn't a decorative upgrade. It changes how the home lives.
Recent 2026 coverage points to buyers prioritizing tighter envelopes, better insulation packages, smarter ventilation, energy-efficient windows, and smaller, more intentional layouts rather than oversized shells. The same coverage estimates insulation alone at about $1.40 to $4.80 per square foot, which makes it a real budget line, not an afterthought, according to this 2026 barndominium design and insulation trend report.
That lines up with what works on actual jobs. Bigger isn't automatically better. A shell with good insulation planning, solid air sealing, and sensible square footage is easier to heat, easier to cool, and easier to finish well.
Final Checks Budget Planning and Moving Toward Finish Out
Before you call the shell done, walk it like someone who has to live with every shortcut.
The dried-in shell should be checked for panel fastening, trim fit, flashing continuity, door and window operation, visible seal gaps, and final bolt-torque verification. If something looks slightly off outside, it usually becomes more annoying once interior work starts. Finish crews notice every crooked opening and every leak path.
A practical dried-in punch list
Use a short punch list before the next trades move in:
- Roof and wall panels: Confirm fastening looks complete and consistent.
- Flashing and trim: Check transitions, corners, ridge areas, and penetrations.
- Doors and windows: Open and close everything now, before interior trim disguises a bad install.
- Interior dryness: Look for any signs of water entry after rain or hose testing.
- Hardware and bolts: Make sure the final inspection pass happened.
The other final check is financial, not physical. Rebuild the budget from this point forward based on what still needs to be bought and installed. If you need a baseline for that finish-out conversation, this barndominium cost guide helps frame the remaining categories after shell completion.
The right next move
Owners usually make one of two mistakes here. They either celebrate the shell as if the expensive part is over, or they freeze because the next phase feels less defined than the steel package did.
The better move is simple. Get documented bids for insulation, mechanicals, plumbing, electrical, and interior finish work before you lose momentum. And when you're vetting shell help in the first place, prioritize builders and erectors who can show documented shell experience, clear scope boundaries, and completed work that looks straight, dry, and well-detailed.
A good shell gives you options. A poorly planned shell gives you hidden costs.
If you're trying to sort shell builders from turnkey contractors, BarndoBuilderList gives you a research-based starting point with builder summaries, scope tags, and location tools across the U.S. It's useful when you need to compare who really handles shell work, who coordinates foundation and dry-in, and who expects the owner to manage the rest.
- barndominium shell construction
- barndominium shell cost
- barndominium foundation
- steel barndominium shell
- barndominium insulation