2 Story Barndominium Kits: Costs and What to Check
Compare 2 story barndominium kits by scope, engineering, stairs, financing and real cost, with a checklist for vetting kit suppliers and local builders.
The usual advice for 2 story barndominium kits is to compare shell prices, choose a floor plan, and use the upper level to get more space from the same foundation. That starts the decision in the wrong place. Before comparing prices, establish what the supplier will deliver, what your local engineer must approve, and what your lender and insurer will accept.
A kit can be a sensible way to buy a structure. It isn't automatically a complete home package, a permit-ready design, or an asset that an appraiser will value at your construction cost. The better purchase is the package you can finish, occupy, finance, and insure without unresolved responsibilities.
Table of Contents
- What a Two-Story Kit Includes and What It Leaves Out
- Pros, Cons and Fit
- Usable Floor Area, Stairs and Envelope Specs
- Structural Engineering to Request Before You Order
- Why Published Kit Prices Mislead and What to Add
- Financing, Insurance and Appraisal Readiness
- Dividing Scope Between Kit Supplier and Local Builder
- Choose Your Delivery Path by Situation
What a Two-Story Kit Includes and What It Leaves Out
A two-story kit is a structural package, not necessarily a finished residence. The word kit doesn't establish whether you're buying loose materials, an assembled enclosure, or a completed home.
Start by assigning each proposal to a scope tier. These are comparison categories, not promises about what any particular supplier includes.
Kit scope tiers and what each includes
| Scope tier | Typically included | Typically excluded | Who usually completes the rest |
|---|---|---|---|
| Materials package | Framing, roof and wall panels, fasteners, some doors and windows | Foundation, concrete, insulation, labor, interior work, site work | Owner or erection crew |
| Erected shell | Materials plus frame and envelope erection | Insulation, mechanical systems, finishes, foundation, site work | Owner or local builder for the interior |
| Turnkey finished home | Shell, insulation, interior finishes, mechanical systems | Land, utility connections, some site work | Builder under one contract |
Treat doors, windows, permits, utility connections, and delivery as named contract items. Even turnkey needs a boundary: a finished building contract may stop short of bringing power, water, or wastewater service to the building.
Footprint isn't finished living area
A Built Western kit comparison describes a 40-by-60-foot building with a 2,400-square-foot footprint, potentially reaching approximately 4,800 square feet with a second story; it also lists shell materials at $60,000–$150,000 and says finishes, labor, concrete, and site work commonly add another 1.5–2 times the shell cost.
The space advantage is real, but it needs qualification. A full upper floor, a partial loft, and a tall shell capable of accepting a future floor aren't equivalent products. Ask for separate labels showing ground footprint, upper-floor area, conditioned living area, and unfinished shop or garage area.
The second-floor scope deserves its own attachment to the quote. Floor framing, decking, stairs, landings, guardrails, and engineering shouldn't disappear inside an allowance labeled interior work. Identify who supplies each component and who installs it, including the connections between the upper floor and the main frame.
Quote test: Have every supplier label its proposal materials package, erected shell, or turnkey finished home, then list exclusions in writing.
A missing item isn't necessarily a problem. An item that neither contractor has priced is.
Pros, Cons and Fit
Sort the framing system before choosing a supplier. Buyers commonly encounter red-iron steel packages, steel rigid-frame packages, and post-frame kits, but those aren't three completely separate engineering categories. Red iron can describe the steel used in a rigid-frame system, so marketing labels alone won't tell you how the building works.
Steel packages for open lower levels
A red-iron proposal should identify the actual frame configuration, column locations, connections, and upper-floor support. Its advantage is a clearly specified primary structure. Its limitation is that the main frame doesn't, by itself, establish what you'll receive for the residential floor above.
Steel rigid-frame kits are worth investigating when a wide, open shop is central to the design. Request a column layout and erection plan rather than assuming every proposed span is available without added support. Connection access, bracing installation, lifting equipment, and crew capability belong in the erection discussion.
Post-frame packages for an integrated layout
Post-frame kits use a different load-support strategy. Evaluate the proposed posts, foundation detail, and floor supports together rather than treating the upper level as a conventional interior dropped into an agricultural shell.
- Potential fit: A layout that can accommodate the supplier's post spacing and a foundation engineered for the site.
- Critical limitation: Upper-floor framing and stair support need explicit details, not a promise that the owner can add them later.
- Contract question: Are posts embedded, bracket-mounted, or supported through another engineered detail?
Don't choose steel solely because it sounds stronger, or post-frame solely because it sounds simpler. Choose the system whose engineered support locations suit your rooms, shop openings, and stair arrangement, then confirm that the erection contractor can build that specific system.
Usable Floor Area, Stairs and Envelope Specs
Advertised floor area isn't a furniture plan. A stair opening removes upper-level floor space, while the stair run and landings occupy space below. A loft with an attractive headline area can still leave awkward circulation or an inconvenient bedroom arrangement.
The 2021 International Building Code stair provisions distinguish dwelling-unit provisions allowing a 7 3/4-inch maximum riser and 10-inch minimum tread from the broader baseline of 7 inches maximum and 11 inches minimum, with top and bottom landings required. Confirm the locally adopted code and applicable exceptions before accepting the layout.
Residential stair limits compared with the baseline IBC
| Stair element | Dwelling-unit residential provision | Baseline IBC limit | Check on the kit drawing |
|---|---|---|---|
| Maximum riser height | 7 3/4 inches | 7 inches | Total rise divided by number of risers |
| Minimum tread depth | 10 inches | 11 inches | Tread depth shown in the stair section |
| Landings | Required at top and bottom | Required at top and bottom | Landing depth tied to stair width |
Check the section, not just the floor plan
Divide the finished floor-to-floor rise by the proposed number of risers. Then inspect the stair section for tread dimensions, headroom, landing dimensions, and the transition onto the upper floor. Finish thickness belongs in this calculation, because the completed stair must work after flooring is installed.
Don't let someone reserve a rectangle marked stairs and defer the geometry. Ask the designer to show the actual run and opening before placing bathrooms, doors, or kitchen cabinets around it.
Specify the complete envelope
For insulation, request assembly performance rather than a product label. Metal framing creates conductive paths, so cavity insulation alone doesn't describe the completed wall.
- Whole-wall R-value: Request the assembly description, including framing and continuous insulation.
- Thermal-bridge treatment: Identify details at girts, columns, framed openings, and floor edges.
- Window performance: Specify U-factor and solar-heat-gain coefficient for the selected units.
- Air leakage: Establish a blower-door target and identify who seals penetrations.
- Moisture control: Require a climate-appropriate vapor-control strategy and continuity details.
Finally, mark the stair opening and landings on the supplier's drawing and measure the remaining usable rooms. Compare plans by the space you can occupy, not by the exterior rectangle.
Structural Engineering to Request Before You Order
The upper floor, stair, and lateral load path form one integrated structure. They aren't optional interior fit-out. A shell designed to enclose space doesn't automatically include a complete design for supporting occupied rooms above it.
The 2024 International Building Code structural-design chapter lists 40 psf uniform live loading and a 300-pound concentrated load for stairs and exits in one- and two-family dwellings, while other occupancies can require 100 psf uniform loading. Those stair values aren't a substitute for an engineer specifying the upper floor's applicable live loads and actual dead loads.
Use the following checklist to keep the structure and its documentation together.
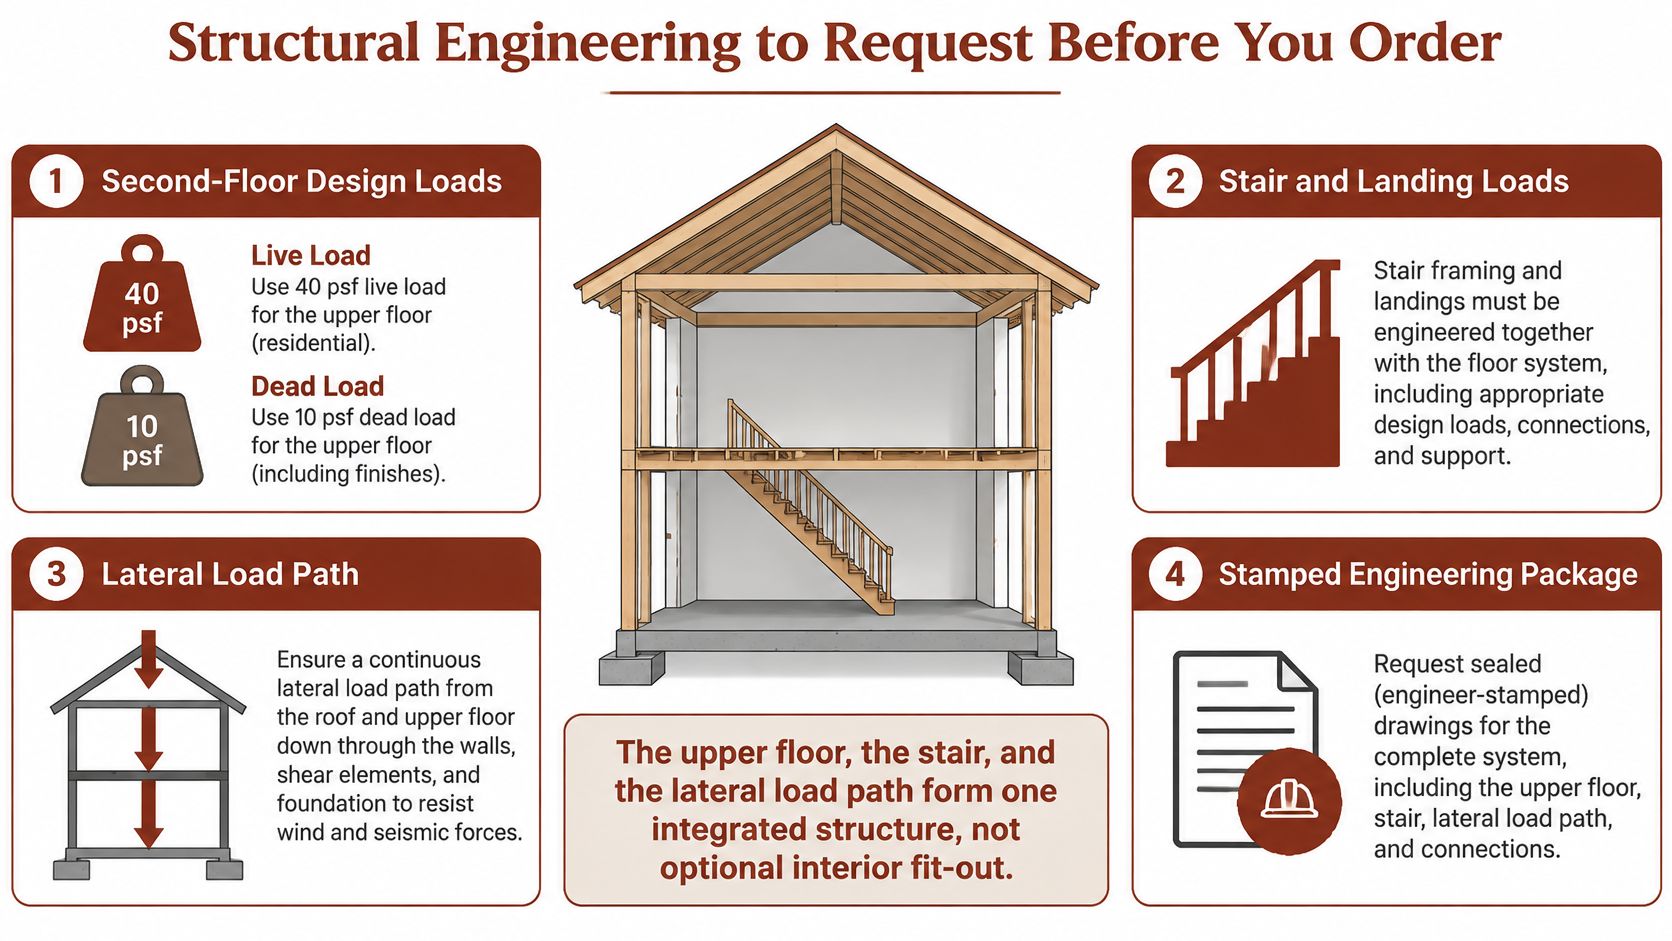
Request a complete calculation package
Ask for stamped drawings and calculations addressing these items:
- Floor-joist spans and deflection. Identify member sizes, support points, design loads, and allowable movement. Ask how the design addresses floor vibration as well as strength.
- Floor diaphragm. Specify sheathing, fastening, blocking, and the connections that transfer lateral forces into the supporting system.
- Uplift resistance. Show how roof and wall connections resist uplift and transfer those forces toward the foundation.
- Hold-downs and connection schedules. Require identifiable hardware, fasteners, and installation details rather than a general instruction to secure the frame.
- Anchor-bolt schedule. Coordinate anchor sizes, locations, embedment, and tolerances with the foundation drawings before concrete placement.
- Site assumptions. List wind, snow, seismic, and soil assumptions, along with the intended occupancy and the applicable design standard.
Follow the load path to the ground
Trace the connections from the roof through walls and floor diaphragms into the foundation and anchors. The important question isn't whether each component is strong on its own. It's whether the engineer has designed the connections that allow those components to work together.
A steel-frame label isn't a performance rating. Different sites can require different bracing, posts, connections, and foundations even when the advertised building dimensions are identical.
A stamped shell drawing isn't proof that someone has engineered the stairs, upper floor, and foundation as a complete building.
Send the proposed engineering package to a locally licensed engineer, and confirm submittal requirements with the building official, before paying a nonrefundable deposit. Ask who will resolve review comments and whether that work is included.
Why Published Kit Prices Mislead and What to Add
Published starting prices answer a narrow question: what did that source list for that package at that time? They don't establish equivalent scope.
Published starting prices for two-story kits
| Source and year | Kit described | Listed starting price | Scope to confirm before comparing |
|---|---|---|---|
| Buildings Guide, 2025 | Two-story red-iron barndominium kit | From $45,240 | Whether the price includes the upper floor, stairs, and engineering |
| Homedit, 2023 | Westbrook two-story kit, smallest size 1,200 square feet | From $40,002 | Whether the price is shell only or includes interior work |
| Hansen Buildings, 2026 | 48-by-40-by-22-foot kit with second-floor loft | $87,885 | Whether loft floor and stairs are included and whether the price is shell only |
These listings differ in date, dimensions, and package description. Don't rank them by sticker price or divide each price by an assumed finished living area.
Use cost bands without confusing their scope
The Houseplans barndominium cost guide gives approximately $65–$160 per square foot for finished barndominiums, $20–$35 for basic metal-kit materials, and $30–$50 for erected shells; applied to a 2,000-square-foot comparison, those imply $130,000–$320,000 finished, $40,000–$70,000 in materials, or $60,000–$100,000 for an erected shell, before the respective exclusions.
These are budgeting references, not bids for your site. In particular, don't assume a shell supplier uses total conditioned floor area as the denominator. Establish whether its area means ground footprint, enclosed floor area, or completed residential space.
Rebuild the price around missing work
Create separate columns for materials, erection, foundation, interior, and site work. Assign every allowance to a column and name the contractor responsible for turning it into a fixed scope.
- Foundation and concrete: Excavation, footings, slab, reinforcement, anchors, and below-slab services.
- Interior completion: Insulation, partitions, plumbing, electrical, HVAC, finishes, and fixtures.
- Vertical construction: Upper-floor materials, installation, stairs, landings, and guards.
- Project delivery: Engineering revisions, permits, inspections, freight, unloading, and equipment.
- Site services: Access, grading, drainage, utility connections, and wastewater provisions.
Use our barndominium cost planning guide to organize the broader budget, but obtain project-specific pricing before committing.
The decisive comparison is completed scope against completed scope. A low kit quote remains useful only after you've priced everything needed to turn its contents into an occupiable home.
Financing, Insurance and Appraisal Readiness
A larger two-story design can make financing harder, not easier. Added space doesn't guarantee a matching appraised value, especially when the layout combines finished living quarters with an unfinished shop.
LegalClarity's discussion of barndominium financing and layouts notes that appraisers may struggle to find comparable sales and may use a cost approach that produces a lower valuation; it also identifies occupancy, fire separation, construction details, emergency-service distance, and commercial use as insurance considerations. These are reasons to seek project-specific decisions before ordering, not assumptions that every barndominium will be difficult to finance.
Build a transaction-readiness worksheet
Give the lender and insurer the actual proposed use of every area. A private hobby shop, vehicle garage, and customer-facing business shouldn't be presented as interchangeable spaces.
- Construction draws: Match payment requests to build phases and ask whether material deposits qualify.
- Appraisal treatment: Establish how unfinished, garage, shop, and residential areas will be classified.
- Occupancy approval: Identify certificate-of-occupancy requirements and any limits on phased completion.
- Life safety: Supply stair, egress, and required fire-separation details.
- Permanent foundation: Provide the drawings and documentation the lender requests.
- Builder qualifications: Confirm required credentials and whether owner-performed work is acceptable.
- Completion budget: Include all work needed for occupancy, not just the kit invoice.
- Insurance evidence: Obtain confirmation of acceptable construction coverage and completed-building replacement-cost coverage.
Our guide to appraisals and construction draws can help organize those conversations.
Before ordering: Ask the lender and insurer to evaluate the same plans, occupancy description, and completion budget.
A supplier's attractive residential rendering won't explain a commercial operation beneath the bedrooms. Disclose intended uses plainly, then get requirements in writing. If the lender's accepted value is below the completion budget, resolve the funding gap before committing to materials.
Dividing Scope Between Kit Supplier and Local Builder
A generic kit plan can't resolve every jurisdiction-specific design issue. The California residential-code document published by Calistoga illustrates why location-specific snow design and roof configurations matter, including drift accumulation. It isn't a national rulebook, but it demonstrates why adapting a kit requires more than changing the address on the drawings.
Who handles each step of a two-story kit project
| Responsibility | Kit supplier | Local builder | Owner |
|---|---|---|---|
| Shell engineering and stamped drawings | Supplies contracted package and engineering, confirm extent | Coordinates site requirements with licensed designer | Authorizes revisions and confirms payment responsibility |
| Foundation and site work | Usually excluded from kit | Scopes and builds using approved design | Provides survey and obtains required soil information |
| Permits and inspections | Supplies contracted permit documents | Applies and schedules if contracted | Confirms permit holder and receives final approvals |
| Erection and interior | Supplies erection crew only if contracted | Completes interior and mechanicals if contracted | Approves finishes and scope changes |
A builder doesn't automatically have authority to revise or seal structural drawings. Name the licensed designer responsible for changes, and state who pays when site conditions or permit comments require revisions.
Verify both sides of the handoff
Before signing, obtain:
- Accepted documentation: Stamped drawings suitable for local review.
- Design criteria: Ground snow, wind, seismic, soil, and foundation assumptions.
- Floor information: Live loads, dead loads, and support details.
- Connections: A coordinated schedule covering the shell-to-foundation and floor-to-frame interfaces.
- Written scope: Clear shell or turnkey boundaries and completed two-story references.
Our shell-builder selection guide supports the first-call screening process. Every builder we list shows barndominium signal on its own website, such as a dedicated page, repeated mentions, or a clear reference worth a first conversation.
Website signal isn't an endorsement. Confirm completed two-story work in your state and climate conditions, then have supplier and builder acknowledge their responsibilities in writing.
Choose Your Delivery Path by Situation
Choose the delivery method around the work you can reliably manage, not just the package you can afford to order. Bring the site plan and intended room uses into that decision.
Use the plans to discuss responsibilities before materials arrive.
Owner-builders with trade skills can consider materials or erected-shell delivery. Phase interior work only when the permit, lender, and occupancy requirements allow it.
Buyers using construction financing should prioritize a documented completion contract and budget. An erected-shell arrangement needs a named contractor for the remaining residential work.
Match the contract to the intended use
Rural shop-house buyers should resolve occupancy classification, fire separation, and insurance before choosing shell scope. Don't buy extra shop volume on the assumption that it will receive residential appraisal treatment.
General contractors and erectors should price the upper floor, stair installation, and engineering coordination separately. Architects and designers should verify usable rooms, stair geometry, and structural support locations before fixing the layout.
Use this video alongside your project discussion, not instead of the written scope.
Match your situation to the responsibility table and take the relevant requirements to each shortlisted candidate. Choose the team that can account for the entire delivery path.
Tell BarndoBuilderList about your two-story project, including its location, planned shop use, and whether you need shell or turnkey delivery. We check with builders on your behalf so you can start conversations around the scope you need, then verify engineering, financing, and insurance before ordering the kit.
Related builder lists
These state and metro pages match places named in this article.
- 2 story barndominium kits
- barndominium kit cost
- barndominium kit checklist
- two story barndominium
- metal building kits